文档
- 1: 总体介绍
- 2: 概念
- 2.1: IOC-控制反转
- 2.2: AOP-面向切面编程
- 3: 快速开始
- 3.1: 环境安装
- 3.2: 实现依赖注入demo
- 4: 示例
- 4.1: 依赖注入
- 4.1.1: redis 客户端注入
- 4.1.2: GORM 客户端注入
- 4.1.3: 通过 API 获取对象
- 4.2: 接口 AOP 能力
- 4.3: 扩展 autowire 模型
- 4.3.1: 配置注入
- 4.3.2: RPC 能力
- 4.3.3: gRPC 客户端注入
- 5: 任务
- 5.1: 电商系统搭建
- 6: 参考
- 7: 开发者文档
- 7.1: 项目结构
- 7.2: 注册自定义结构
- 7.3: 自定义 AOP 实现
- 7.4: 自定义自动装载模型
1 - 总体介绍
Alibaba/IOC-golang 是一款 Go 语言依赖注入框架,提供了一套完善的 IoC 容器。
适配于任何使用 Go 语言开发的场景,帮助开发者管理依赖对象,降低代码耦合度。在运维场景下,可以通过扩展框架自动注入的代理 AOP 层实现各种运维能力。
1.1 - 功能
支持任何结构、接口的依赖注入,具备完善的对象生命周期管理机制。
可以接管对象的创建、参数注入、工厂方法、参数来源等等,并拥有可扩展性。
基于 AOP 的思路,为由框架接管的对象提供默认的接口代理层,在面向接口编程的情景下,可以在 业务无侵入 的前提下,使用基于结构代理 AOP 层扩展的丰富运维能力。例如接口查询,参数动态监听,方法粒度链路追踪,性能瓶颈分析,分布式场景下全链路方法粒度追踪等。
- 监控
- 日志采集
- 链路追踪
- 事务能力
我们提供了代码生成工具,开发者可以通过注解的方式标注结构,从而便捷地生成结构注册代码、结构代理、结构专属接口等。
支持被注入结构的扩展、自动装载模型的扩展、调试 AOP 层的扩展。
提供覆盖主流中间件的预制对象,方便直接注入使用。
1.2 - 设计理念
通过标签与配置文件,实现依赖注入和参数读取
通过注解,实现注册代码自动生成
通过注入接口代理,实现 AOP 可扩展调试层
2 - 概念
框架基础概念中英文对照
| 中文 | 英文 | 描述 |
|---|---|---|
| 结构 | Struct | Go 语言的 struct 类型结构体 |
| 对象 | Object | Go 语言中的实例化对象 |
| 接口 | Interface | Go 语言中的 interface 类型接口 |
| 方法 | Method | Go 语言中的接口、对象大写字母开头的函数方法 |
| 依赖注入 | Dependency Injection(DI) | |
| 自动装载 | Auto Wire | |
| 结构描述符 | Struct Descriptor (SD) | |
| 结构描述键 | Struct Descriptor Identification(SDID) | 自动装载模型内索引结构的唯一ID。 |
2.1 - IOC-控制反转
IOC 即控制反转,旨在降低代码的耦合度,减少冗余重复的对象组装代码,依赖注入是 IOC 思路的一种具体实现。
本框架命名为 IOC-golang, 是服务于 Go 开发者的 IOC 框架,使用语言原生概念,符合语言开发习惯。框架衍生出的多种能力和可扩展性,其能力建立在框架设计的 IOC 模型基础之上。
2.1.1 - 依赖注入
概念
依赖注入(Dependency Injection,DI) 是指开发人员无需显式地创建对象,而是通过特定标注(在本框架中为 标签 )的方式声明字段,由框架在对象加载阶段,将实例化对象注入该字段,以供后续使用。
优点
依赖注入可以降低代码的耦合度,减少冗余代码量,优化代码逻辑,使得开发人员可以只关心业务逻辑,帮助面向对象编程,面向接口编程。
IOC-golang 的依赖注入能力
本框架从两个角度实现依赖注入:
结构如何被提供
开发人员需要准备好需要被注入的结构,将它注册到框架。注册到框架的代码可以由开发人员手动编写,开发人员也可以通过使用注解标记结构,使用 iocli 的代码生成能力自动生成注册代码,从而减少工作量。
一个带有 注解 的结构
// +ioc:autowire=true
// +ioc:autowire:type=singleton

type App struct {}
由 iocli 工具生成,或用户手动编写的注册代码。摘自 example/helloworld/zz_generated.ioc.go#L21
func init() {
	singleton.RegisterStructDescriptor(&autowire.StructDescriptor{
		Factory: func() interface{} {
			return &App{}
		},
	})
}
结构如何被使用
通过标签注入
开发人员需要通过标签来标记需要注入的结构字段。
需要通过标签注入依赖至字段的结构,其本身必须也注册在框架上。
// +ioc:autowire=true
// +ioc:autowire:type=singleton

type App struct {
	MySubService Service `singleton:"main.ServiceImpl1"`
}
通过 API 可获取对象,入参为 结构 ID (结构描述 ID,SDID) 和构造参数(如需要)。
通过 API 获取对象的过程会默认通过代码生成。参考 example/helloworld/zz_generated.ioc.go#L190
appInterface, err := singleton.GetImpl("main.App")
if err != nil {
  panic(err)
}
app := appInterface.(*App)

redisInterface, err := normal.GetImpl("github.com/alibaba/ioc-golang/extension/normal/redis.Impl", &Config{
    Address: "localhost:6379"
})
if err != nil {
  panic(err)
}
redisClient := redisInterface.(*Impl)
2.1.2 - 自动装载模型
概念
自动装载(Autowire)模型 封装了一类对象的装载方式,是本框架对装载过程抽象出的概念和接口。
用户需要定义的结构千变万化,如果每个结构描述符都要提供完整的装载过程信息,将是一件很麻烦的事情。我们将一类相似的结构抽象出一个 自动装载模型,选择注册在该模型的所有结构都需要遵循该模型的加载策略,这大大降低了用户需要提供的 结构描述符 内的定制化信息量,从而提高开发效率。
框架内置了两个基础自动装载模型:单例模型(singleton),多例模型(normal)
当前版本中,框架内置了三个扩展的自动装载模型:配置(config),gRPC 客户端(grpc),RPC(rpc)。其中配置模型是多例模型的扩展,gRPC 客户端是单例模型的扩展,RPC 模型提供了(rpc-client 和 rpc-server)两侧的自动装载模型。关于这三个自动装载模型的应用,可以参考example/autowire example/third_party/grpc 中给出的例子。
基于这些自动装载模型,框架内置了基于“扩展自动装载模型”的多个结构。例如,用户可以用几行代码将 “gRPC 客户端存根”注册在 “grpc 装载模型” 之上【示例】,再例如可以方便地从配置文件中的 指定位置读入 数据。
2.1.3 - 结构描述符
概念
结构描述符(Struct Descriptor, SD) 用于描述一个被开发者定义的结构,包含对象生命周期的全部信息,例如结构类型是什么,依赖哪些参数,如何被构造等等信息。
SD可以通过 注解 的方式使用工具 自动生成 。但还是推荐开发人员了解本框架定义的结构生命周期和结构描述信息,以便更清晰地了解加载过程。
对象生命周期
开发人员在 Go 语言开发过程中需要时时关注对象的生命周期,一个常见的对象生命周期如下:
- 对象定义:开发人员编码,编写结构,实现接口,确定模型(单例、多例..) 。
- 加载全部依赖:依赖的下游对象创建、配置读入等。
- 对象创建:产生一个基于该对象的指针
- 对象构造:获取全部依赖,并将其组装到空对象中,产生可用对象。
- 对象使用:调用对象的方法,读写对象字段。
- 对象销毁:销毁对象,销毁无需再使用的依赖对象。
参数
本框架的“参数”概念,是一个结构体,该结构体包含了创建一个对象所需全部依赖,并提供了构造方法。
例如:
type Config struct {
	Host      string
	Port      string
	Username  string
	Password  string
}

func (c *Config) New(mysqlImpl *Impl) (*Impl, error) {
	var err error
	mysqlImpl.db, err = gorm.Open(mysql.Open(getMysqlLinkStr(c)), &gorm.Config{})
	mysqlImpl.tableName = c.TableName
	return mysqlImpl, err
}
Config 结构即为 Impl 结构的“参数”。其包含了产生 Impl 结构的全部信息。
结构描述符 (Struct Descriptor)
定义的结构描述符如下:摘自 autowire/model.go
type StructDescriptor struct {
	Factory       func() interface{} // raw struct
	ParamFactory  func() interface{}
	ParamLoader   ParamLoader
	ConstructFunc func(impl interface{}, param interface{}) (interface{}, error)
	DestroyFunc   func(impl interface{})
	Alias         string // alias of SDID
	TransactionMethodsMap map[string]string // transaction

	impledStructPtr interface{} // impledStructPtr is only used to get name
}
Factory【必要】
结构的工厂函数,返回值是未经初始化的空结构指针,例如
func () interface{}{
	return &App{}
}
ParamFactory【非必要】
参数的工厂函数,返回值是未经初始化的空参数指针,例如
func () interface{}{
	return &Config{}
}
ParamLoader【非必要】
参数加载器定义了参数的各个字段如何被加载,是从注入标签传入、还是从配置读入、或是以一些定制化的方式。
框架提供了默认的参数加载器,详情参阅 参数加载器概念
Constructor【非必要】
构造函数定义了对象被组装的过程。
入参为对象指针和参数指针,其中对象指针的所有依赖标签都已被注入下游对象,可以在构造函数中调用下游对象。参数指针的所有字段都已经按照参数加载器的要求加载好。构造函数只负责拼装。
返回值为经过拼装后的指针。例如:
func(i interface{}, p interface{}) (interface{}, error) {
  param := p.(*Config)
  impl := i.(*Impl)
  return param.New(impl)
},
DestroyFunc 【非必要】
定义了对象的销毁过程,入参为对象指针。
Alias 【非必要】
TransactionMethodsMap 【非必要】
基于 Saga 模型的事务函数声明, 这一 Map 的 Key 为需要使用事务能力的方法名,Value 为该方法的回滚函数,如果 Value 为空,则无回滚逻辑。参考事务例子 example/transaction
结构ID
- 定义
结构(描述) ID定义为:"${包名}.${结构名}"
结构(描述) ID (Struct Description Identification) 在本文档和项目中多处被缩写为 SDID。
SDID 是唯一的,用于索引结构的键,类型为字符串。
- 使用
例如,开发人员在 使用 API 获取对象 时,需要针对使用的自动装载模型,传入 SDID 来定位结构,从而获取对象。
2.1.4 - 参数加载器
概念
参数加载器描述了依赖参数如何在对象构造之前被加载,包括但不限于从配置加载、从 标签 参数加载等等。
参数加载器作为 SD(结构描述符)的一部分,可以被结构提供方定制化,也可以使用自动装载模型提供的默认参数加载器。
默认参数加载器
任何 SD 内定义参数加载器均被优先执行,如果加载失败,则尝试使用默认参数加载器加载。
默认参数加载器被两个基础自动装载模型(singleton、normal)引入。依次采用三种方式加载参数,如果三种方式均加载失败,则抛出错误。
方式1 从标签指向的对象名加载参数,参考 配置文件结构规范
Load support load struct described like:
```go
normal.RegisterStructDescriptor(&autowire.StructDescriptor{
		Factory:   func() interface{}{
			return &Impl{}
		},
		ParamFactory: func() interface{}{
			return &Config{}
		},
		ConstructFunc: func(i interface{}, p interface{}) (interface{}, error) {
			return i, nil
		},
	})
}

type Config struct {
	Address  string
	Password string
	DB       string
}

```
with
Autowire type 'normal'
StructName 'Impl'
Field:
	MyRedis Redis `normal:"github.com/alibaba/ioc-golang/extension/normal/redis.Impl, redis-1"`

from:

```yaml
extension:
  normal:
    github.com/alibaba/ioc-golang/extension/normal/redis.Impl:
      redis-1:
        param:
          address: 127.0.0.1
          password: xxx
          db: 0
```
方式2 从标签加载参数
Load support load param like:
```go
type Config struct {
	Address  string
	Password string
	DB       string
}
```

from field:

```go
NormalRedis  normalRedis.Redis  `normal:"github.com/alibaba/ioc-golang/extension/normal/redis.Impl,address=127.0.0.1&password=xxx&db=0"`
```
方式3 从配置加载参数,参考 配置文件结构规范
Load support load struct described like:
```go
normal.RegisterStructDescriptor(&autowire.StructDescriptor{
		Factory:   func() interface{}{
			return &Impl{}
		},
		ParamFactory: func() interface{}{
			return &Config{}
		},
		ConstructFunc: func(i interface{}, p interface{}) (interface{}, error) {
			return i, nil
		},
	})
}

type Config struct {
	Address  string
	Password string
	DB       string
}
```
with
Autowire type 'normal'
StructName 'Impl'

from:

```yaml
autowire:
  normal:
    github.com/alibaba/ioc-golang/extension/normal/redis.Impl:
      param:
        address: 127.0.0.1
        password: xxx
        db: 0
```
2.1.5 - 注解
概念
注解(annotation) 是 Go 代码中符合特定格式的注释,一般位于结构定义之前。可被命令行工具代码扫描识别,从而获取结构信息,自动生成需要的代码。 例如 快速开始 示例中的注解:
// +ioc:autowire=true
// +ioc:autowire:type=singleton

type App struct {
	...
}
注解在 Go 应用开发的过程中,是一种直观、清晰的结构描述方式,通过使用注解进行标注,使用工具自动生成相关代码,可减少开发人员的工作量,降低代码重复率。
注解与代码生成
注解与代码生成能力,是为了让开发者无需关心 SD(结构描述符) 的组装和注册过程。开发者只需定义好结构,正确标注注解,即可使用 iocli 工 具自动生成当前目录和子目录下的 SD ,从而将编写的结构交给框架管理。
iocli 工具支持的注解
详情参阅 iocli #注解与代码生成
2.2 - AOP-面向切面编程
AOP (面向切面编程)是一种编程设计思想,旨在通过拦截业务过程的切面,实现特定模块化的能力,降低业务逻辑之间的耦合度。
IOC-golang 框架为所管理的 注入至接口字段 的结构封装 AOP 切面,从而实现方法粒度的运维可观测能力。
2.2.1 - 代理对象
概念
原始对象 是通过 结构描述符 直接创建的对象。
代理对象是对开发者提供的针对原始对象的封装,在 IOC-golang 的设计中,将“封装了 AOP 拦截器至原始结构,并赋值给接口”的对象,定义为“代理对象”。针对代理对象的函数调用在业务逻辑上完全等价于针对原始对象的函数调用,并为原始对象提供针对函数调用的 AOP 能力,这一能力可被应用在监控、可视化、事务等场景。
1. 代理对象由结构使用者关心
IOC-golang 在依赖注入的开发过程中存在两个视角,结构提供者和结构使用者。框架接受来自结构提供者定义的结构,并按照结构使用者的要求把结构提供出来。
结构提供者只需关注结构本体,无需关注结构实现了哪些接口。结构使用者需要关心结构的注入和使用方式,例如 通过 API 获取,或者通过 标签 注入。如通过标签注入,是注入至接口,或是注入至结构体指针。
2. 代理对象的获取
框架会默认为 注入/获取 至接口的场景注入代理对象。
2.1 通过标签注入代理对象
// +ioc:autowire=true
// +ioc:autowire:type=singleton

type App struct {
    // 将结构对象注入至结构体指针
    ServiceStruct *ServiceStruct `singleton:""`

    // 将 main.ServiceImpl1 结构封装成代理对象,并注入至接口字段
    ServiceImpl Service `singleton:"main.ServiceImpl1"`
}
App 的 ServiceStruct 字段是具体结构的指针,字段本身已经可以定位期望被注入的结构,因此不需要在标签中给定期望被注入的结构名。
App 的 ServiceImpl 字段是一个名为 Service 的接口,期望注入的结构指针是 main.ServiceImpl。本质上是一个从结构到接口的断言逻辑,虽然框架可以进行接口实现的校验,但仍需要结构使用者保证注入的接口实现了该方法。对于这种注入到接口的方式,IOC-golang 框架自动为 main.ServiceImpl 结构创建代理,并将代理结构注入在 ServiceImpl 字段,因此这一接口字段具备了 AOP 能力。
因此,ioc 更建议开发者面向接口编程,而不是直接依赖具体结构,除了 AOP 能力之外,面向接口编程也会提高 go 代码的可读性、单元测试能力、模块解耦合程度等。
2.2 通过 API 的方式获取代理对象
IOC-golang 框架的开发者可以通过 API 的方式 获取结构指针,通过调用自动装载模型(例如singleton)的 GetImpl 方法,可以获取结构指针。可以在生成的代码中找到类似如下的函数。
func GetServiceStructSingleton() (*ServiceStruct, error) {
  i, err := singleton.GetImpl("main.ServiceStruct", nil)
  if err != nil {
    return nil, err
  }
  impl := i.(*ServiceStruct)
  // 返回原始结构体指针
  return impl, nil
}
上述获取的是 结构体指针,我们更推荐开发者通过 API ,调用下面的方法获取接口对象,通过调用自动装载模型(例如singleton)的 GetImplWithProxy 方法,可以获取代理对象,该对象可被断言为一个接口供使用。
在使用 iocli 工具生成代码的时候,会默认为每个结构生成一个结构专属接口,可以在生成的代码中找到类似如下的函数,通过调用该函数,可以直接获取专属接口形态的代理对象。
func GetServiceStructIOCInterfaceSingleton() (ServiceStructIOCInterface, error) {
  // 获取代理对象
  i, err := singleton.GetImplWithProxy("main.ServiceStruct", nil)
  if err != nil {
    return nil, err
  }
  // 将代理对象断言成对象专属接口 ServiceStructIOCInterface
  impl := i.(ServiceStructIOCInterface)
  // 返回结构专属接口形态的代理对象
  return impl, nil
}
这两种通过 API 获取对象的方式可以由 iocli 工具自动生成。注意!这些代码的作用都是方便开发者调用 API ,减少代码编写量,而 ioc 自动装载的逻辑内核并不是由工具生成的,这是与 wire 提供的依赖注入实现思路的不同点之一,也是很多开发者误解的一点。
3. 结构专属接口
通过上面的介绍,我们知道 IOC-golang 框架提供了封装 AOP 层的代理对象,其注入方式是 强依赖接口 的。但要求开发者为自己的全部结构都手写一个与之匹配的接口出来,这会耗费大量的时间。因此 iocli 工具可以自动生成结构专属接口,减轻开发人员的代码编写量。
例如一个名为 ServiceImpl 的结构,其包含 GetHelloString 方法
// +ioc:autowire=true
// +ioc:autowire:type=singleton

type ServiceImpl struct {
}

func (s *ServiceImpl) GetHelloString(name string) string {
    return fmt.Sprintf("This is ServiceImpl1, hello %s", name)
}
当执行 iocli gen 命令后, 会在当前目录生成一份代码zz_generated.ioc.go 其中包含该结构的“专属接口”:
type ServiceImplIOCInterface interface {
    GetHelloString(name string) string
}
专属接口的命名为 $(结构名)IOCInterface,专属接口包含了结构的全部方法。专属接口的作用有二:
1、减轻开发者工作量,方便直接通过 API 的方式 Get 到代理结构,方便直接作为字段注入,见上述1.2节。
2、结构专属接口可以直接定位结构 ID,因此在注入专属接口的时候,标签无需显式指定结构类型:
// +ioc:autowire=true
// +ioc:autowire:type=singleton

type App struct {
    // 注入 ServiceImpl 结构专属接口,无需在标签中指定结构ID
    ServiceOwnInterface ServiceImplIOCInterface `singleton:""`
}
2.2.2 - AOP 实现
概念
一个 AOP 实现 是基于框架定义的 AOP 结构所创建的实例化对象。其字段包含了一类 AOP 所关注问题的解决方案。
func init() {
  // 注册一个名为 “list” 的 AOP 实现到框架。该实现提供了基于 debug 端口展示所有接口方法的 gRPC 服务。
	aop.RegisterAOP(aop.AOP{
		Name: "list",
		GRPCServiceRegister: func(server *grpc.Server) {
			list.RegisterListServiceServer(server, newListServiceImpl())
		},
	})
}
AOP 实现,具体来讲是 代理对象 在原始对象的基础上封装的拦截层及其周边能力。框架提供了一些基础的 AOP 代理层实现,例如上述 “list”。开发人员也可以将自定义的 AOP 代理层注册在框架上使用。一个 AOP 实现对象,关注的是一类问题的 AOP 解决方案,例如可视化、事务、链路追踪。
AOP 实现是一个对象,包含一些聚合在一起的概念。在当前版本中,它可以包含 AOP 领域的四个角度的解决方案:
函数调用拦截器
可以拦截针对所有代理对象的请求。
RPC调用拦截器
RPC 自动装载模型是框架默认提供的扩展自动装载模型,它提供了框架原生支持的 RPC 能力,可被开发者直接选用。在 RPC 自动装载模型中,会在所有 RPC 过程中调用已注册的 AOP 实现提供的 “RPC调用拦截器”,从而拦截全量框架原生 RPC 请求。
GRPC 服务注册器
本框架提供了调试端口 (默认 1999),被一个基于 gRPC 的 debug 服务监听 。AOP 实现可以将“待采集” 或 “待触发” 的被动逻辑以 gRPC Service 的形式注册在 debug 服务上,从而对外暴露。
与 gRPC Service 相对应的是客户端,在本框架默认提供的 AOP 实现中,客户端作为指令被注册在了 iocli 工具上,其实现与 AOP 实现处于同一pkg 下。本质上,gRPC 客户端、gRPC Service 、 两个拦截器的实现形成闭环,共同解决当前 AOP 实现所关注的问题。开发者可以选择其中的一个或多个进行实现。
ConfigLoader
提供当前 AOP 实现的读取框架配置能力。
AOP 结构的代码定义
type AOP struct {
	Name                  string
	InterceptorFactory    interceptorFactory // type interceptorFactory func() Interceptor
	RPCInterceptorFactory rpcInterceptorFactory // type rpcInterceptorFactory func() RPCInterceptor
	GRPCServiceRegister   gRPCServiceRegister // type gRPCServiceRegister func(server *grpc.Server)
	ConfigLoader          func(config *common.Config)
}
“AOP 实现” 的工作原理
AOP 实现的加载和工作流程:
在 init 函数中将 AOP 实现注册在框架上,引入这一 pkg。
func init(){ aop.RegisterAOP(aop.AOP{ ... }) }ioc.Load()阶段,加载框架配置,调用 ConfigLoader 将框架配置传递给 AOP 实现。依赖注入阶段,如首次出现构建代理对象的情况,将调用所有注册在框架的 AOP 实现的 InterceptorFactory,获取到所有单例的函数拦截器。封装入代理对象。InterceptorFactory 只会被调用一次。
RPC 调用阶段,如首次出现 RPC 调用到情况,将调用所有注册在框架的 AOP 实现的 RPCInterceptorFactory,获取到所有单例的RPC 调用拦截器,应用在 RPC过程中。
2.2.3 - 拦截器
概念
拦截器 是 AOP 思路的基本切面单元。在 AOP 实现 中提到,本框架提供了针对代理对象函数调用的拦截器模型,和框架原生支持的 RPC 拦截器模型。
需要注意,在当前版本中,函数拦截器都是单例的,即 AOP 实现中的工厂函数只会被调用一次。函数拦截器尚不能保证调用顺序。
拦截器接口
// 函数拦截器
type Interceptor interface {
	BeforeInvoke(ctx *InvocationContext)
	AfterInvoke(ctx *InvocationContext)
}

// RPC 调用拦截器
type RPCInterceptor interface {
	BeforeClientInvoke(req *http.Request) error
	AfterClientInvoke(rsp *http.Response) error
	BeforeServerInvoke(c *gin.Context) error
	AfterServerInvoke(c *gin.Context) error
}
开发者可以按需定制单例模式的拦截器,并通过 AOP 实现注册在框架上,以供使用。
- 函数拦截器
函数拦截器的参数为 InvocationContext 其包含了一次请求的上下文信息:
type InvocationContext struct {
	ProxyServicePtr interface{} // 被调用的代理对象
	SDID            string // 原始对象ID
	MethodName      string // 被调用的方法名
  MethodFullName  string // 被调用方法全名,包含了包名、结构名、方法名,例如 github.com/alibaba/ioc-golang/test.(*App).Run
	Params          []reflect.Value // 请求参数列表
	ReturnValues    []reflect.Value // 返回参数列表
	GrID            int64 // 当前 goroutine ID
}
在调用原始对象的函数之前,所有注册在框架等函数拦截器的 BeforeInvoke 方法将依此被调用,此时上下文中 ReturnValues字段为空 ;在调用原始对象的函数之后,所有注册在框架等函数拦截器的 BeforeInvoke 方法将依此被调用。
拦截器注册 API
在 init 方法中跟随 AOP 对象注册至框架,例如:
func init() {
	aop.RegisterAOP(aop.AOP{
		Name: "monitor",
		InterceptorFactory: func() aop.Interceptor {
			return getMonitorInterceptorSingleton() // 函数调用拦截器注册
		},
		GRPCServiceRegister: func(server *grpc.Server) {
			monitorPB.RegisterMonitorServiceServer(server, newMonitorService())
		},
	})
}
3 - 快速开始
3.1 - 环境安装
安装 Go 环境
建议 go version >= 1.17
将 $GOPATH/bin 加入环境变量
安装 iocli 代码生成工具至 $GOPATH/bin
go install github.com/alibaba/ioc-golang/iocli@v1.0.3
3.2 - 实现依赖注入demo
教程
我们将开发一个具有以下拓扑的工程,在本例子中,可以展示
- 注册代码生成
- 接口注入
- 对象指针注入
- API 获取对象
- 调试能力,查看运行中的接口、方法;以及实时监听参数值、返回值。
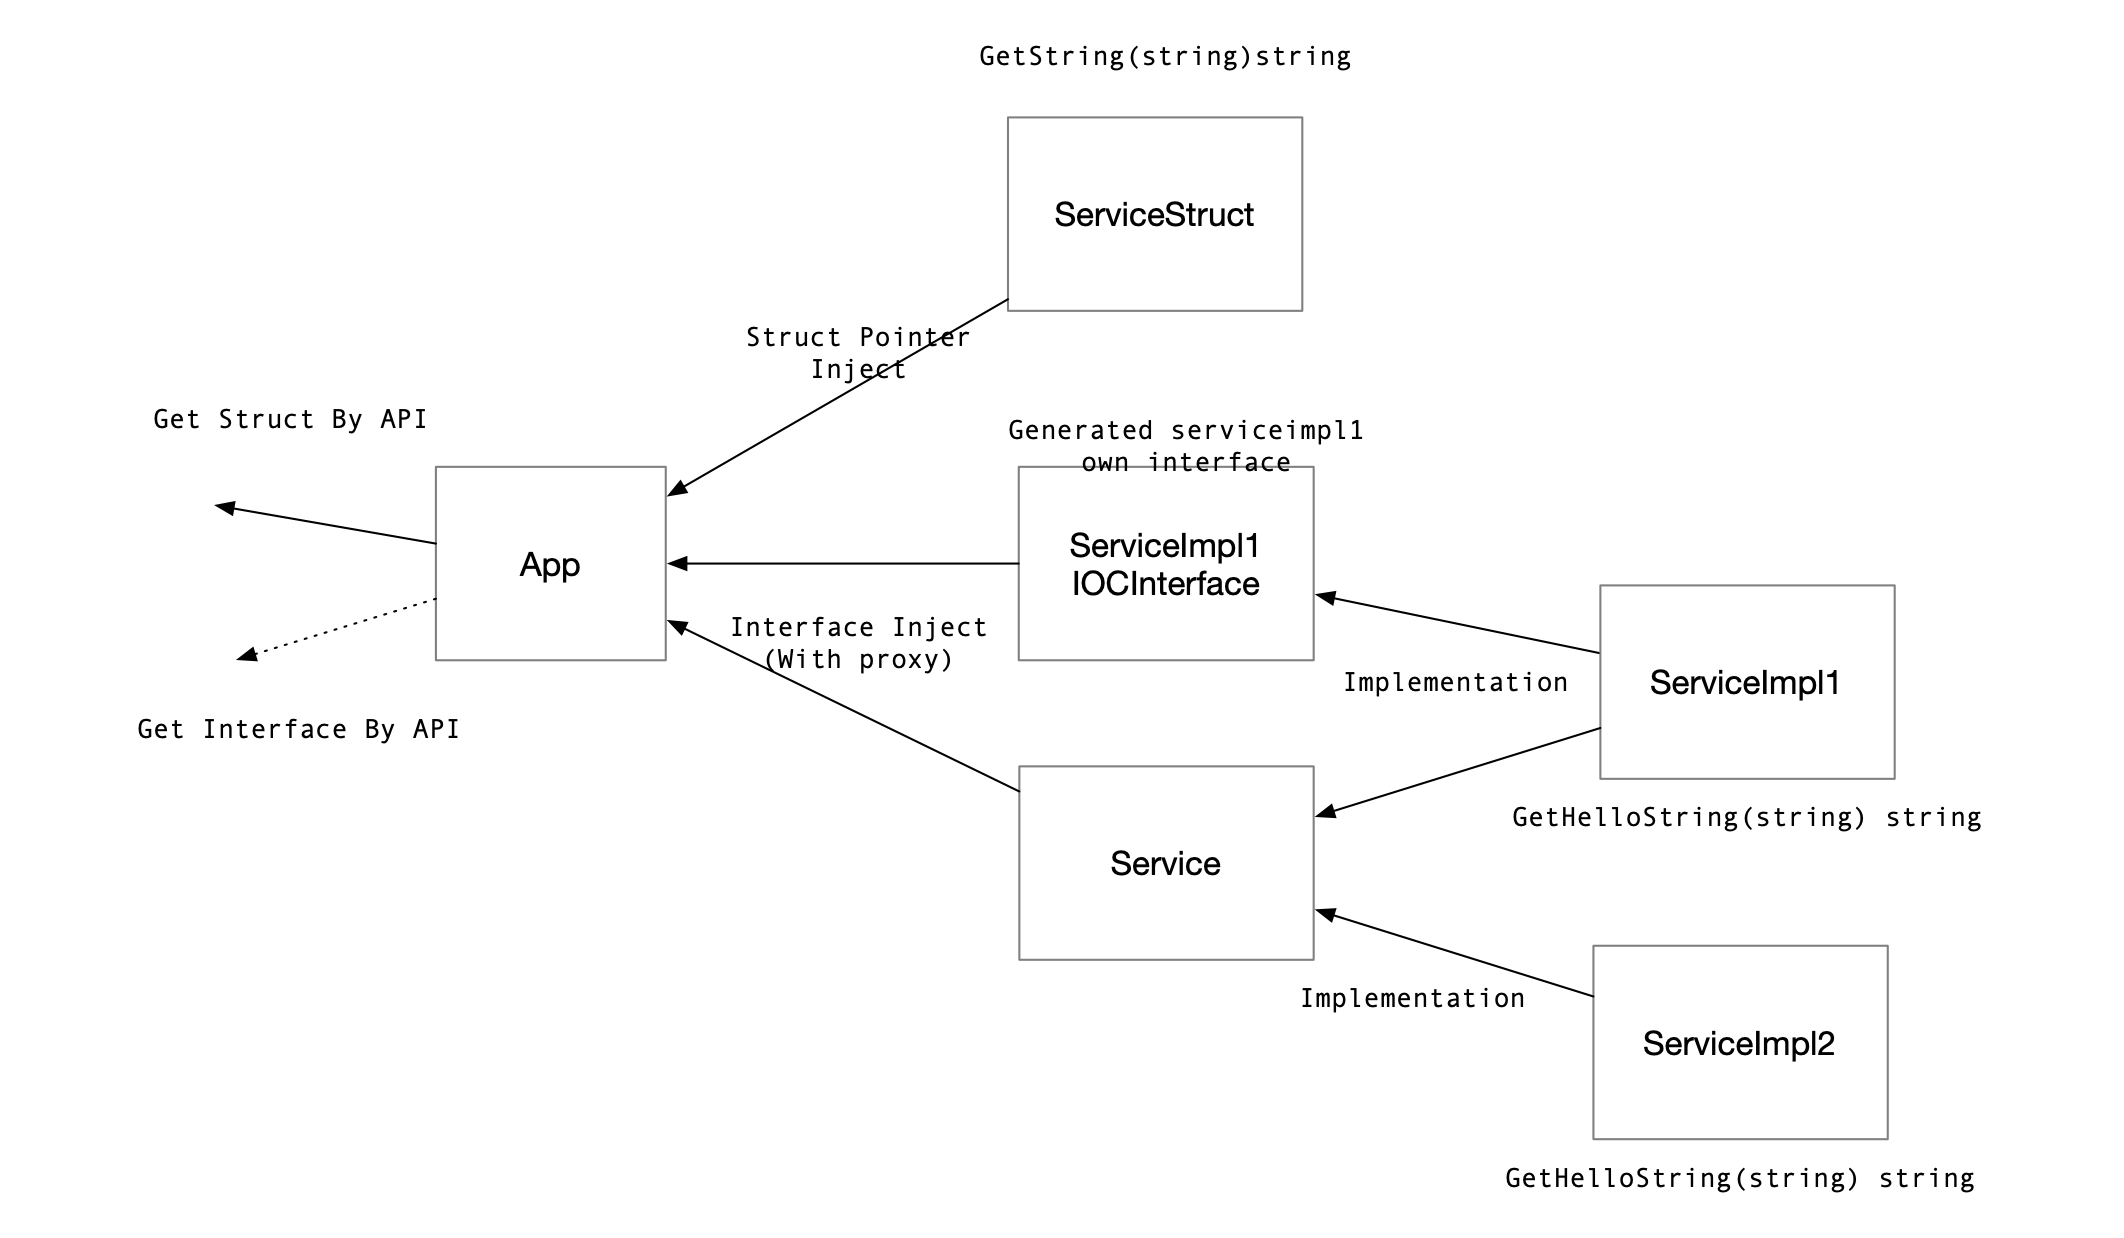
用户所需编写的全部代码:main.go
package main

import (
	"fmt"
	"time"

	"github.com/alibaba/ioc-golang"
)

// +ioc:autowire=true
// +ioc:autowire:type=singleton

type App struct {
	// 将封装了代理层的 main.ServiceImpl1 指针注入到 Service 接口,单例模型,需要在标签中指定被注入结构
	ServiceImpl1 Service `singleton:"main.ServiceImpl1"`

	// 将封装了代理层的 main.ServiceImpl2 指针注入到 Service 接口,单例模型,需要在标签中指定被注入结构
	ServiceImpl2 Service `singleton:"main.ServiceImpl2"`

	// 将封装了代理层的 main.ServiceImpl1 指针注入到它的专属接口 'ServiceImpl1IOCInterface'
  // 注入专属接口的命名规则是 '${结构名}IOCInterface',注入专属接口无需指定被注入结构,标签值为空即可。
	Service1OwnInterface ServiceImpl1IOCInterface `singleton:""`

	// 将结构体指针注入当前字段
	ServiceStruct *ServiceStruct `singleton:""`
}

func (a *App) Run() {
	for {
		time.Sleep(time.Second * 3)
		fmt.Println(a.ServiceImpl1.GetHelloString("laurence"))
		fmt.Println(a.ServiceImpl2.GetHelloString("laurence"))

		fmt.Println(a.Service1OwnInterface.GetHelloString("laurence"))

		fmt.Println(a.ServiceStruct.GetString("laurence"))
	}
}

type Service interface {
	GetHelloString(string) string
}

// +ioc:autowire=true
// +ioc:autowire:type=singleton

type ServiceImpl1 struct {
}

func (s *ServiceImpl1) GetHelloString(name string) string {
	return fmt.Sprintf("This is ServiceImpl1, hello %s", name)
}

// +ioc:autowire=true
// +ioc:autowire:type=singleton

type ServiceImpl2 struct {
}

func (s *ServiceImpl2) GetHelloString(name string) string {
	return fmt.Sprintf("This is ServiceImpl2, hello %s", name)
}

// +ioc:autowire=true
// +ioc:autowire:type=singleton

type ServiceStruct struct {
}

func (s *ServiceStruct) GetString(name string) string {
	return fmt.Sprintf("This is ServiceStruct, hello %s", name)
}

func main() {
	// 加载所有结构
	if err := ioc.Load(); err != nil {
		panic(err)
	}

	// 获取结构
	app, err := GetAppSingleton()
	if err != nil {
		panic(err)
	}
	app.Run()
}
上述所说的“代理层”,是框架为“以接口形式注入/获取”的结构体,默认封装的代理,可以扩展一系列运维操作,参考代理对象。我们推荐开发者在编写代码的过程中基于接口编程,则所有对象都可拥有运维能力。
编写完毕后,当前目录执行以下命令,初始化 go mod ,拉取最新代码,生成结构注册代码。(mac 环境可能因权限原因需要sudo):
% go mod init ioc-golang-demo
% export GOPROXY="https://goproxy.cn"
% go mod tidy
% go get github.com/alibaba/ioc-golang@master
% sudo iocli gen
会在当前目录生成:zz_generated.ioc.go,开发者无需关心这一文件,这一文件中就包含了上面使用的 GetAppSingleton 方法
//go:build !ignore_autogenerated
// +build !ignore_autogenerated

// Code generated by iocli

package main

import (
        autowire "github.com/alibaba/ioc-golang/autowire"
        normal "github.com/alibaba/ioc-golang/autowire/normal"
        "github.com/alibaba/ioc-golang/autowire/singleton"
        util "github.com/alibaba/ioc-golang/autowire/util"
)

func init() {
        normal.RegisterStructDescriptor(&autowire.StructDescriptor{
                Factory: func() interface{} {
                        return &app_{}
                },
        })
        singleton.RegisterStructDescriptor(&autowire.StructDescriptor{
                Factory: func() interface{} {
                        return &App{}
                },
        })
  ...
func GetServiceStructIOCInterface() (ServiceStructIOCInterface, error) {
        i, err := singleton.GetImplWithProxy(util.GetSDIDByStructPtr(new(ServiceStruct)), nil)
        if err != nil {
                return nil, err
        }
        impl := i.(ServiceStructIOCInterface)
        return impl, nil
}
查看当前目录文件
% tree
.
├── go.mod
├── go.sum
├── main.go
└── zz_generated.ioc.go

0 directories, 4 files
执行程序
go run .
控制台打印输出:
  ___    ___     ____                           _
 |_ _|  / _ \   / ___|           __ _    ___   | |   __ _   _ __     __ _
  | |  | | | | | |      _____   / _` |  / _ \  | |  / _` | | '_ \   / _` |
  | |  | |_| | | |___  |_____| | (_| | | (_) | | | | (_| | | | | | | (_| |
 |___|  \___/   \____|          \__, |  \___/  |_|  \__,_| |_| |_|  \__, |
                                |___/                               |___/
Welcome to use ioc-golang!
[Boot] Start to load ioc-golang config
[Config] Load default config file from ../conf/ioc_golang.yaml
[Config] Load ioc-golang config file failed. open .../Desktop/workplace/alibaba/conf/ioc_golang.yaml: no such file or directory
 The load procedure is continue
[Boot] Start to load debug
[Debug] Debug port is set to default :1999
[Boot] Start to load autowire
[Autowire Type] Found registered autowire type normal
[Autowire Struct Descriptor] Found type normal registered SD main.serviceStruct_
[Autowire Struct Descriptor] Found type normal registered SD main.app_
[Autowire Struct Descriptor] Found type normal registered SD main.serviceImpl1_
[Autowire Struct Descriptor] Found type normal registered SD main.serviceImpl2_
[Autowire Type] Found registered autowire type singleton
[Autowire Struct Descriptor] Found type singleton registered SD main.App
[Autowire Struct Descriptor] Found type singleton registered SD main.ServiceImpl1
[Autowire Struct Descriptor] Found type singleton registered SD main.ServiceImpl2
[Autowire Struct Descriptor] Found type singleton registered SD main.ServiceStruct
[Debug] Debug server listening at :1999
This is ServiceImpl1, hello laurence
This is ServiceImpl2, hello laurence
This is ServiceImpl1, hello laurence
This is ServiceStruct, hello laurence
...
可看到,依赖注入成功,程序正常运行。
调试程序
可看到打印出的日志中包含,说明 Debug 服务已经启动。
[Debug] Debug server listening at :1999
新开一个终端,使用 iocli 的调试功能,查看所有拥有代理层的结构和方法。默认端口为 1999。
% iocli list
main.ServiceImpl1
[GetHelloString]

main.ServiceImpl2
[GetHelloString]
监听方法的参数和返回值。以监听 main.ServiceImpl 结构的 GetHelloString 方法为例,每隔三秒钟,函数被调用两次,打印参数和返回值。
% iocli watch main.ServiceImpl1 GetHelloString
========== On Call ==========
main.ServiceImpl1.GetHelloString()
Param 1: (string) (len=8) "laurence"

========== On Response ==========
main.ServiceImpl1.GetHelloString()
Response 1: (string) (len=36) "This is ServiceImpl1, hello laurence"

========== On Call ==========
main.ServiceImpl1.GetHelloString()
Param 1: (string) (len=8) "laurence"

========== On Response ==========
main.ServiceImpl1.GetHelloString()
Response 1: (string) (len=36) "This is ServiceImpl1, hello laurence"
,,,
注解分析
// +ioc:autowire=true
代码生成工具会识别到标有 +ioc:autowire=true 注解的对象

// +ioc:autowire:type=singleton
标记注入模型为 singleton 单例模型,还有 normal 多例模型等扩展
更多
您可以参阅 示例 查阅更多例子和框架高级用法
4 - 示例
最新示例代码,位于 ioc-golang/example
4.1 - 依赖注入
4.1.1 - redis 客户端注入
简介
本示例展示了注入 Redis 客户端能力。
在应用开发过程中,通过 SDK 操作 Redis 是一个常见的诉求。
ioc-golang 框架提供了注入 Redis 连接的能力,开发者可以在配置文件中指定好 Redis 地址、密码、db名等信息,通过标签注入连接,无需手动创建、组装。
注入模型与结构
关键代码
import(
	normalMysql "github.com/alibaba/ioc-golang/extension/normal/mysql"
)

// +ioc:autowire=true
// +ioc:autowire:type=singleton

type App struct {
	NormalRedis    normalRedis.Redis `normal:"github.com/alibaba/ioc-golang/extension/normal/redis.Impl"`
	NormalDB1Redis normalRedis.Redis `normal:"github.com/alibaba/ioc-golang/extension/normal/redis.Impl,db1-redis"`
	NormalDB2Redis normalRedis.Redis `normal:"github.com/alibaba/ioc-golang/extension/normal/redis.Impl,db2-redis"`
	NormalDB3Redis normalRedis.Redis `normal:"github.com/alibaba/ioc-golang/extension/normal/redis.Impl,address=127.0.0.1:6379&db=3"`
}
被注入字段类型
normalRedis.Redis 接口
标签
开发人员可以为 normalRedis.Redis 类型的字段增加
normal:"Impl,$(configKey),$(tableName)"标签。从而注入Redis sdk。例子中的
normal:"github.com/alibaba/ioc-golang/extension/normal/redis.Impl"的意义为,将配置文件内autowire.normal.<github.com/alibaba/ioc-golang/extension/normal/redis.Impl>.param定义的值作为参数。例子中的
normal:"github.com/alibaba/ioc-golang/extension/normal/redis.Impl,db1-redis"的意义为,将配置文件内autowire.normal.<github.com/alibaba/ioc-golang/extension/normal/redis.Impl>.db1-redis.param定义的值作为参数。例子中的
normal:"github.com/alibaba/ioc-golang/extension/normal/redis.Impl,db2-redis"的意义为,将配置文件内autowire.normal.<github.com/alibaba/ioc-golang/extension/normal/redis.Impl>.db2-redis.param定义的值作为参数。例子中的
normal:"github.com/alibaba/ioc-golang/extension/normal/redis.Impl,address=127.0.0.1:6379&db=3"的意义为,使用标签内定义的 key-value 作为参数配置。默认参数加载策略详情请参阅参数加载器
autowire:
  normal:
    github.com/alibaba/ioc-golang/extension/normal/redis.Impl:
      db1-redis:
        param:
          address: localhost:6379
          db: 1
      db2-redis:
        param:
          address: localhost:6379
          db: 2
      param:
        address: localhost:6379
        db: 0
运行示例
例子会注入多个位于127.0.0.1:6379 的Redis 客户端,数据库id分别为 0、1、2、3.
需要确保您本地运行了redis,可通过 docker run -p6379:6379 redis:latest 快速启动一个。
注入后,方可调用该接口提供的方法。可获取裸 Redis 连接,也可以直接使用封装好的 API 操作Redis。
cd example/autowire_redis_client/cmd
go run .
  ___    ___     ____            ____           _
 |_ _|  / _ \   / ___|          / ___|   ___   | |   __ _   _ __     __ _
  | |  | | | | | |      _____  | |  _   / _ \  | |  / _` | | '_ \   / _` |
  | |  | |_| | | |___  |_____| | |_| | | (_) | | | | (_| | | | | | | (_| |
 |___|  \___/   \____|          \____|  \___/  |_|  \__,_| |_| |_|  \__, |
                                                                    |___/
Welcome to use ioc-golang!
[Boot] Start to load ioc-golang config
[Config] Load config file from ../conf/ioc_golang.yaml
[Boot] Start to load debug
[Debug] Debug mod is not enabled
[Boot] Start to load autowire
[Autowire Type] Found registered autowire type singleton
[Autowire Struct Descriptor] Found type singleton registered SD main.App
[Autowire Type] Found registered autowire type normal
[Autowire Struct Descriptor] Found type normal registered SD github.com/alibaba/ioc-golang/extension/normal/redis.Impl
client0 get  db0
client1 get  db1
client2 get  db2
client3 get  db3
可看到打印出了已经写入四个 redis db 的值。
4.1.2 - GORM 客户端注入
简介
本示例展示了注入基于 GORM 的数据库客户端能力。
在应用开发过程中,通过 SDK 操作数据库是一个常见的诉求,GORM 是应用较广泛的 Go 数据库 sdk。
ioc-golang 框架提供了注入数据库连接的能力,开发者可以在配置文件中指定好数据库地址、密码信息,通过标签注入连接,无需手动创建、组装 GORM 客户端。
注入模型与结构
关键代码
import(
	normalMysql "github.com/alibaba/ioc-golang/extension/normal/mysql"
)

// +ioc:autowire=true
// +ioc:autowire:type=singleton

type App struct {
	MyDataTable normalMysql.Mysql `normal:"github.com/alibaba/ioc-golang/extension/normal.Impl,my-mysql,mydata"`
}
被注入字段类型
normalMysql.Mysql 接口
标签
开发人员可以为 normalMysql.Mysql 类型的字段增加
normal:"github.com/alibaba/ioc-golang/extension/normal.Impl,$(configKey),$(tableName)"标签。从而注入指定数据库的指定表 sdk。例子中的
normal:"github.com/alibaba/ioc-golang/extension/normal.Impl,my-mysql,mydata"的意义为,将配置文件内autowire.normal.<github.com/alibaba/ioc-golang/extension/normal/mysql.Impl>.my-mysql.param定义的值作为参数。autowire: normal: github.com/alibaba/ioc-golang/extension/normal/mysql.Impl: my-mysql: param: host: "127.0.0.1" port: 3306 username: "root" password: "root" dbname: "test"例子会建立一个位于127.0.0.1:3306 的数据库连接,用户名为root、密码为 root、数据库名为test、表名为mydata。
注入后,方可调用该接口提供的方法,获取裸 gorm 连接,或者直接使用封装好的 API 操作数据表。
type Mysql interface {
	GetDB() *gorm.DB
	SelectWhere(queryStr string, result interface{}, args ...interface{}) error
	Insert(toInsertLines UserDefinedModel) error
	Delete(toDeleteTarget UserDefinedModel) error
	First(queryStr string, findTarget UserDefinedModel, args ...interface{}) error
	Update(queryStr, field string, target interface{}, args ...interface{}) error
}
4.1.3 - 通过 API 获取对象
简介
本示例展示了通过 API 调用的方式获取对象的能力。
在应用开发过程中,部分依赖通过注入的方式预置在字段中,也有一部分依赖是在程序运行过程中动态生成的。常规做法是通过手动拼装结构的方式,或者通过调用构造函数的方式获取对象。
ioc-golang 框架提供了中心化的获取对象 API。
- 该 API 推荐被结构提供者封装,从而提供一个具象的 API 供用户调用。该 API 传入所需配置结构,返回具体的接口。
extension/normal/redis/redis.go
func GetRedis(config *Config) (Redis, error) {
	mysqlImpl, err := normal.GetImpl(SDID, config)
	if err != nil {
		return nil, err
	}
	return mysqlImpl.(Redis), nil
}
- 如果结构提供者并没有提供上述 API,用户同样也可以直接调用,传入参数并获取对象。
对象获取 API
多例(normal)
autowire/normal/normal.go
func GetImpl(sdID string, param interface{}) (interface{}, error) {}每次调用多例获取 API,将创建一个新对象。
单例(singleton)
autowire/singleton/singleton.go
func GetImpl(sdID string) (interface{}, error) {}单例模型全局只拥有一个对象,通过 API 只能获取而不能创建,在框架启动时所有单例模型指针将基于配置/标签创建好。
关键代码
import(
	"github.com/alibaba/ioc-golang/autowire/normal"
	"github.com/alibaba/ioc-golang/autowire/singleton"
	"github.com/alibaba/ioc-golang/extension/normal/redis"
)


func (a *App) Run() {
  // 通过 normal 提供的全局 API,传递结构描述 ID 和配置结构,创建多例对象
	normalRedis, err := normal.GetImpl("github.com/alibaba/ioc-golang/extension/normal/redis.Impl", &redis.Config{
		Address: "localhost:6379",
		DB:      "0",
	})
  // 通过 redis 结构提供者定义好的 GetRedis 方法,传递配置结构,创建多例对象
	normalRedis2, err := redis.GetRedis(&redis.Config{
		Address: "localhost:6379",
		DB:      "0",
	})
  ...
}

func main() {
	if err := ioc.Load(); err != nil {
		panic(err)
	}
  // 通过 singleton 提供的全局 API,传递结构描述 ID 获取单例对象
	appInterface, err := singleton.GetImpl("main.App")
	if err != nil {
		panic(err)
	}
	app := appInterface.(*App)

	app.Run()
}
运行示例
需要确保您本地运行了redis,可通过 docker run -p6379:6379 redis:latest 快速启动一个。
例子会通过 API 获取 App 对象和 redis 对象,并调用 redis 对象提供的方法。
 cd example/get_impl_by_api/cmd
 go run .
  ___    ___     ____            ____           _
 |_ _|  / _ \   / ___|          / ___|   ___   | |   __ _   _ __     __ _
  | |  | | | | | |      _____  | |  _   / _ \  | |  / _` | | '_ \   / _` |
  | |  | |_| | | |___  |_____| | |_| | | (_) | | | | (_| | | | | | | (_| |
 |___|  \___/   \____|          \____|  \___/  |_|  \__,_| |_| |_|  \__, |
                                                                    |___/
Welcome to use ioc-golang!
[Boot] Start to load ioc-golang config
[Config] Load config file from ../conf/ioc_golang.yaml
Load ioc-golang config file failed. open ../conf/ioc_golang.yaml: no such file or directory
The load procedure is continue
[Boot] Start to load debug
[Debug] Debug mod is not enabled
[Boot] Start to load autowire
[Autowire Type] Found registered autowire type normal
[Autowire Struct Descriptor] Found type normal registered SD github.com/alibaba/ioc-golang/extension/normal/redis.Impl
[Autowire Type] Found registered autowire type singleton
[Autowire Struct Descriptor] Found type singleton registered SD main.App
get val =  db0
可看到打印出了 redis 中的数据。
4.2 - 接口 AOP 能力
4.2.1 - 可视化
简介
本示例展示了从配置文件注入字段的能力。
在应用开发过程中,从配置文件中读入配置是一个常见的诉求。例如读取数据库的账号密码、下游服务的主机名,以及一些业务配置等。
ioc-golang 框架提供了便捷的基于文件注入配置的能力,使开发者无需手动解析配置文件,无需手动组装对象。
注入模型与结构
关键代码:
import (
  github.com/alibaba/ioc-golang/extension/config
)

// +ioc:autowire=true
// +ioc:autowire:type=singleton

type App struct {
	DemoConfigString *config.ConfigString `config:",autowire.config.demo-config.string-value"`
	DemoConfigInt    *config.ConfigInt    `config:",autowire.config.demo-config.int-value"`
	DemoConfigMap    *config.ConfigMap    `config:",autowire.config.demo-config.map-value"`
	DemoConfigSlice  *config.ConfigSlice  `config:",autowire.config.demo-config.slice-value"`
}
被注入字段类型
目前支持 ConfigString,ConfigInt,ConfigMap,ConfigSlice 四种类型。
需要以 指针 的形式声明字段类型
标签与注入位置
开发人员可以给结构增加 ``config:
",xxx"标签, 标注需要注入的值类型,以及该字段位于配置文件的位置。例子中的
config:",autowire.config.demo-config.string-value"的意义为,将配置文件内
autowire.config.demo-config.string-value的值注入到该字段。对应配置文件:ioc_golang.yaml 中的字符串 “stringValue”
autowire:
  config:
    demo-config:
      int-value: 123
      int64-value: 130117537261158665
      float64-value: 0.001
      string-value: stringValue
      map-value:
        key1: value1
        key2: value2
        key3: value3
        obj:
          objkey1: objvalue1
          objkey2: objvalue2
          objkeyslice: objslicevalue
      slice-value:
        - sliceValue1
        - sliceValue2
        - sliceValue3
        - sliceValue4
运行示例
cd example/autowire_config/cmd
go run .
  ___    ___     ____            ____           _
 |_ _|  / _ \   / ___|          / ___|   ___   | |   __ _   _ __     __ _
  | |  | | | | | |      _____  | |  _   / _ \  | |  / _` | | '_ \   / _` |
  | |  | |_| | | |___  |_____| | |_| | | (_) | | | | (_| | | | | | | (_| |
 |___|  \___/   \____|          \____|  \___/  |_|  \__,_| |_| |_|  \__, |
                                                                    |___/
Welcome to use ioc-golang!
[Boot] Start to load ioc-golang config
[Config] merge config map, depth: [0]
[Boot] Start to load debug
[Debug] Debug mod is not enabled
[Boot] Start to load autowire
[Autowire Type] Found registered autowire type singleton
[Autowire Struct Descriptor] Found type singleton registered SD main.App
[Autowire Type] Found registered autowire type normal
[Autowire Type] Found registered autowire type config
[Autowire Struct Descriptor] Found type config registered SD github.com/alibaba/ioc-golang/extension/config.ConfigInt64
[Autowire Struct Descriptor] Found type config registered SD github.com/alibaba/ioc-golang/extension/config.ConfigInt
[Autowire Struct Descriptor] Found type config registered SD github.com/alibaba/ioc-golang/extension/config.ConfigMap
[Autowire Struct Descriptor] Found type config registered SD github.com/alibaba/ioc-golang/extension/config.ConfigSlice
[Autowire Struct Descriptor] Found type config registered SD github.com/alibaba/ioc-golang/extension/config.ConfigString
[Autowire Struct Descriptor] Found type config registered SD github.com/alibaba/ioc-golang/extension/config.ConfigFloat64
2022/06/06 18:01:22 load config path autowire.config#demo-config#float64-value error =  property [autowire config#demo-config#float64-value]'s key config#demo-config#float64-value not found
stringValue
123
map[key1:value1 key2:value2 key3:value3 obj:map[objkey1:objvalue1 objkey2:objvalue2 objkeyslice:objslicevalue]]
[sliceValue1 sliceValue2 sliceValue3 sliceValue4]
130117537261158665
0
stringValue
123
map[key1:value1 key2:value2 key3:value3 obj:map[objkey1:objvalue1 objkey2:objvalue2 objkeyslice:objslicevalue]]
[sliceValue1 sliceValue2 sliceValue3 sliceValue4]
130117537261158665
0
可看到依次打印出了不同结构的注入配置。
4.2.2 - 事务
简介
本示例展示了从配置文件注入字段的能力。
在应用开发过程中,从配置文件中读入配置是一个常见的诉求。例如读取数据库的账号密码、下游服务的主机名,以及一些业务配置等。
ioc-golang 框架提供了便捷的基于文件注入配置的能力,使开发者无需手动解析配置文件,无需手动组装对象。
注入模型与结构
关键代码:
import (
  github.com/alibaba/ioc-golang/extension/config
)

// +ioc:autowire=true
// +ioc:autowire:type=singleton

type App struct {
	DemoConfigString *config.ConfigString `config:",autowire.config.demo-config.string-value"`
	DemoConfigInt    *config.ConfigInt    `config:",autowire.config.demo-config.int-value"`
	DemoConfigMap    *config.ConfigMap    `config:",autowire.config.demo-config.map-value"`
	DemoConfigSlice  *config.ConfigSlice  `config:",autowire.config.demo-config.slice-value"`
}
被注入字段类型
目前支持 ConfigString,ConfigInt,ConfigMap,ConfigSlice 四种类型。
需要以 指针 的形式声明字段类型
标签与注入位置
开发人员可以给结构增加 ``config:
",xxx"标签, 标注需要注入的值类型,以及该字段位于配置文件的位置。例子中的
config:",autowire.config.demo-config.string-value"的意义为,将配置文件内
autowire.config.demo-config.string-value的值注入到该字段。对应配置文件:ioc_golang.yaml 中的字符串 “stringValue”
autowire:
  config:
    demo-config:
      int-value: 123
      int64-value: 130117537261158665
      float64-value: 0.001
      string-value: stringValue
      map-value:
        key1: value1
        key2: value2
        key3: value3
        obj:
          objkey1: objvalue1
          objkey2: objvalue2
          objkeyslice: objslicevalue
      slice-value:
        - sliceValue1
        - sliceValue2
        - sliceValue3
        - sliceValue4
运行示例
cd example/autowire_config/cmd
go run .
  ___    ___     ____            ____           _
 |_ _|  / _ \   / ___|          / ___|   ___   | |   __ _   _ __     __ _
  | |  | | | | | |      _____  | |  _   / _ \  | |  / _` | | '_ \   / _` |
  | |  | |_| | | |___  |_____| | |_| | | (_) | | | | (_| | | | | | | (_| |
 |___|  \___/   \____|          \____|  \___/  |_|  \__,_| |_| |_|  \__, |
                                                                    |___/
Welcome to use ioc-golang!
[Boot] Start to load ioc-golang config
[Config] merge config map, depth: [0]
[Boot] Start to load debug
[Debug] Debug mod is not enabled
[Boot] Start to load autowire
[Autowire Type] Found registered autowire type singleton
[Autowire Struct Descriptor] Found type singleton registered SD main.App
[Autowire Type] Found registered autowire type normal
[Autowire Type] Found registered autowire type config
[Autowire Struct Descriptor] Found type config registered SD github.com/alibaba/ioc-golang/extension/config.ConfigInt64
[Autowire Struct Descriptor] Found type config registered SD github.com/alibaba/ioc-golang/extension/config.ConfigInt
[Autowire Struct Descriptor] Found type config registered SD github.com/alibaba/ioc-golang/extension/config.ConfigMap
[Autowire Struct Descriptor] Found type config registered SD github.com/alibaba/ioc-golang/extension/config.ConfigSlice
[Autowire Struct Descriptor] Found type config registered SD github.com/alibaba/ioc-golang/extension/config.ConfigString
[Autowire Struct Descriptor] Found type config registered SD github.com/alibaba/ioc-golang/extension/config.ConfigFloat64
2022/06/06 18:01:22 load config path autowire.config#demo-config#float64-value error =  property [autowire config#demo-config#float64-value]'s key config#demo-config#float64-value not found
stringValue
123
map[key1:value1 key2:value2 key3:value3 obj:map[objkey1:objvalue1 objkey2:objvalue2 objkeyslice:objslicevalue]]
[sliceValue1 sliceValue2 sliceValue3 sliceValue4]
130117537261158665
0
stringValue
123
map[key1:value1 key2:value2 key3:value3 obj:map[objkey1:objvalue1 objkey2:objvalue2 objkeyslice:objslicevalue]]
[sliceValue1 sliceValue2 sliceValue3 sliceValue4]
130117537261158665
0
可看到依次打印出了不同结构的注入配置。
4.3 - 扩展 autowire 模型
4.3.1 - 配置注入
简介
本示例展示了从配置文件注入字段的能力。
在应用开发过程中,从配置文件中读入配置是一个常见的诉求。例如读取数据库的账号密码、下游服务的主机名,以及一些业务配置等。
ioc-golang 框架提供了便捷的基于文件注入配置的能力,使开发者无需手动解析配置文件,无需手动组装对象。
注入模型与结构
关键代码:
import (
  github.com/alibaba/ioc-golang/extension/config
)

// +ioc:autowire=true
// +ioc:autowire:type=singleton

type App struct {
	DemoConfigString *config.ConfigString `config:",autowire.config.demo-config.string-value"`
	DemoConfigInt    *config.ConfigInt    `config:",autowire.config.demo-config.int-value"`
	DemoConfigMap    *config.ConfigMap    `config:",autowire.config.demo-config.map-value"`
	DemoConfigSlice  *config.ConfigSlice  `config:",autowire.config.demo-config.slice-value"`
}
被注入字段类型
目前支持 ConfigString,ConfigInt,ConfigMap,ConfigSlice 四种类型。
需要以 指针 的形式声明字段类型
标签与注入位置
开发人员可以给结构增加 ``config:
",xxx"标签, 标注需要注入的值类型,以及该字段位于配置文件的位置。例子中的
config:",autowire.config.demo-config.string-value"的意义为,将配置文件内
autowire.config.demo-config.string-value的值注入到该字段。对应配置文件:ioc_golang.yaml 中的字符串 “stringValue”
autowire:
  config:
    demo-config:
      int-value: 123
      int64-value: 130117537261158665
      float64-value: 0.001
      string-value: stringValue
      map-value:
        key1: value1
        key2: value2
        key3: value3
        obj:
          objkey1: objvalue1
          objkey2: objvalue2
          objkeyslice: objslicevalue
      slice-value:
        - sliceValue1
        - sliceValue2
        - sliceValue3
        - sliceValue4
运行示例
cd example/autowire_config/cmd
go run .
  ___    ___     ____            ____           _
 |_ _|  / _ \   / ___|          / ___|   ___   | |   __ _   _ __     __ _
  | |  | | | | | |      _____  | |  _   / _ \  | |  / _` | | '_ \   / _` |
  | |  | |_| | | |___  |_____| | |_| | | (_) | | | | (_| | | | | | | (_| |
 |___|  \___/   \____|          \____|  \___/  |_|  \__,_| |_| |_|  \__, |
                                                                    |___/
Welcome to use ioc-golang!
[Boot] Start to load ioc-golang config
[Config] merge config map, depth: [0]
[Boot] Start to load debug
[Debug] Debug mod is not enabled
[Boot] Start to load autowire
[Autowire Type] Found registered autowire type singleton
[Autowire Struct Descriptor] Found type singleton registered SD main.App
[Autowire Type] Found registered autowire type normal
[Autowire Type] Found registered autowire type config
[Autowire Struct Descriptor] Found type config registered SD github.com/alibaba/ioc-golang/extension/config.ConfigInt64
[Autowire Struct Descriptor] Found type config registered SD github.com/alibaba/ioc-golang/extension/config.ConfigInt
[Autowire Struct Descriptor] Found type config registered SD github.com/alibaba/ioc-golang/extension/config.ConfigMap
[Autowire Struct Descriptor] Found type config registered SD github.com/alibaba/ioc-golang/extension/config.ConfigSlice
[Autowire Struct Descriptor] Found type config registered SD github.com/alibaba/ioc-golang/extension/config.ConfigString
[Autowire Struct Descriptor] Found type config registered SD github.com/alibaba/ioc-golang/extension/config.ConfigFloat64
2022/06/06 18:01:22 load config path autowire.config#demo-config#float64-value error =  property [autowire config#demo-config#float64-value]'s key config#demo-config#float64-value not found
stringValue
123
map[key1:value1 key2:value2 key3:value3 obj:map[objkey1:objvalue1 objkey2:objvalue2 objkeyslice:objslicevalue]]
[sliceValue1 sliceValue2 sliceValue3 sliceValue4]
130117537261158665
0
stringValue
123
map[key1:value1 key2:value2 key3:value3 obj:map[objkey1:objvalue1 objkey2:objvalue2 objkeyslice:objslicevalue]]
[sliceValue1 sliceValue2 sliceValue3 sliceValue4]
130117537261158665
0
可看到依次打印出了不同结构的注入配置。
4.3.2 - RPC 能力
使用 RPC 能力
简介
本示例展示了基于 IOC-golang 框架的 RPC 能力
在微服务开发过程中,暴露一些对象的方法给外部程序调用是一种常见的场景。
在 IOC-golang 的 RPC 能力的使用场景下,客户端可以直接注入下游接口的客户端存根,以方法调用的形式发起RPC请求。
关键代码
服务端
需要暴露的RPC服务结构使用 // +ioc:autowire:type=rpc 标注,例如 service.go:
import (
	"github.com/alibaba/ioc-golang/example/autowire_rpc/server/pkg/dto"
)

// +ioc:autowire=true
// +ioc:autowire:type=rpc

type ServiceStruct struct {
}

func (s *ServiceStruct) GetUser(name string, age int) (*dto.User, error) {
	return &dto.User{
		Id:   1,
		Name: name,
		Age:  age,
	}, nil
}
使用 iocli 工具生成相关代码。
sudo iocli gen
% tree
.
├── api
│   └── zz_generated.ioc_rpc_client_servicestruct.go
├── service.go
└── zz_generated.ioc.go
会在当前文件目录下生成 zz_generated.ioc.go 包含了服务提供者的结构描述信息。也会在当前目录下创建 api/ 文件夹,并创建当前结构的客户端存根文件 zz_generated.ioc_rpc_client_servicestruct.go
客户端
可以通过标签注入的方法,注入客户端存根,存根中给出下游地址。默认服务暴露端口为2022
import(
  "github.com/alibaba/ioc-golang/example/autowire_rpc/server/pkg/service/api"
)
// +ioc:autowire=true
// +ioc:autowire:type=singleton

type App struct {
	ServiceStruct *api.ServiceStructIOCRPCClient `rpc-client:",address=127.0.0.1:2022"`
}

func (a *App) Run() {
	for {
		time.Sleep(time.Second * 3)
		usr, err := a.ServiceStruct.GetUser("laurence", 23) // RPC调用
		if err != nil {
			panic(err)
		}
		fmt.Printf("get user = %+v\n", usr)
	}
}
运行示例
启动服务端
服务端需要确保引入对应服务提供者结构包: _ "github.com/alibaba/ioc-golang/example/autowire_rpc/server/pkg/service"
package main

import (
	"github.com/alibaba/ioc-golang"
	_ "github.com/alibaba/ioc-golang/example/autowire_rpc/server/pkg/service"
)

func main() {
	// start
	if err := ioc.Load(); err != nil {
		panic(err)
	}
	select {}
}
启动服务端进程,默认 rpc 服务监听 2022 端口
% cd server
% go run .
...
[negroni] listening on :2022
启动客户端
开启另一个终端,进入client目录,启动进程,不断发起调用,获得返回值。
% cd client
% go run .
...
get user = &{Id:1 Name:laurence Age:23}
get user = &{Id:1 Name:laurence Age:23}
get user = &{Id:1 Name:laurence Age:23}
4.3.3 - gRPC 客户端注入
简介
本示例展示了基于 ioc-golang 框架的 gRPC 客户端注入能力。
在进行微服务开发过程中,服务间通信尤为重要,gRPC 是被应用最为广泛的 RPC 框架之一。
在常规开发中,开发者需要从配置中手动读取下游主机名,启动 grpc 客户端。针对一个接口的网络客户端往往是单例模型,如果多个服务都需要使用同一客户端,则还需要开发者维护这个单例模型。
基于 ioc-golang 框架的 gRPC 客户端注入能力,我们可以将客户端的生命周期交付给框架管理,并赋予客户端调试能力,开发者只需要关注注册和使用。
示例介绍
本示例实现了以下拓扑
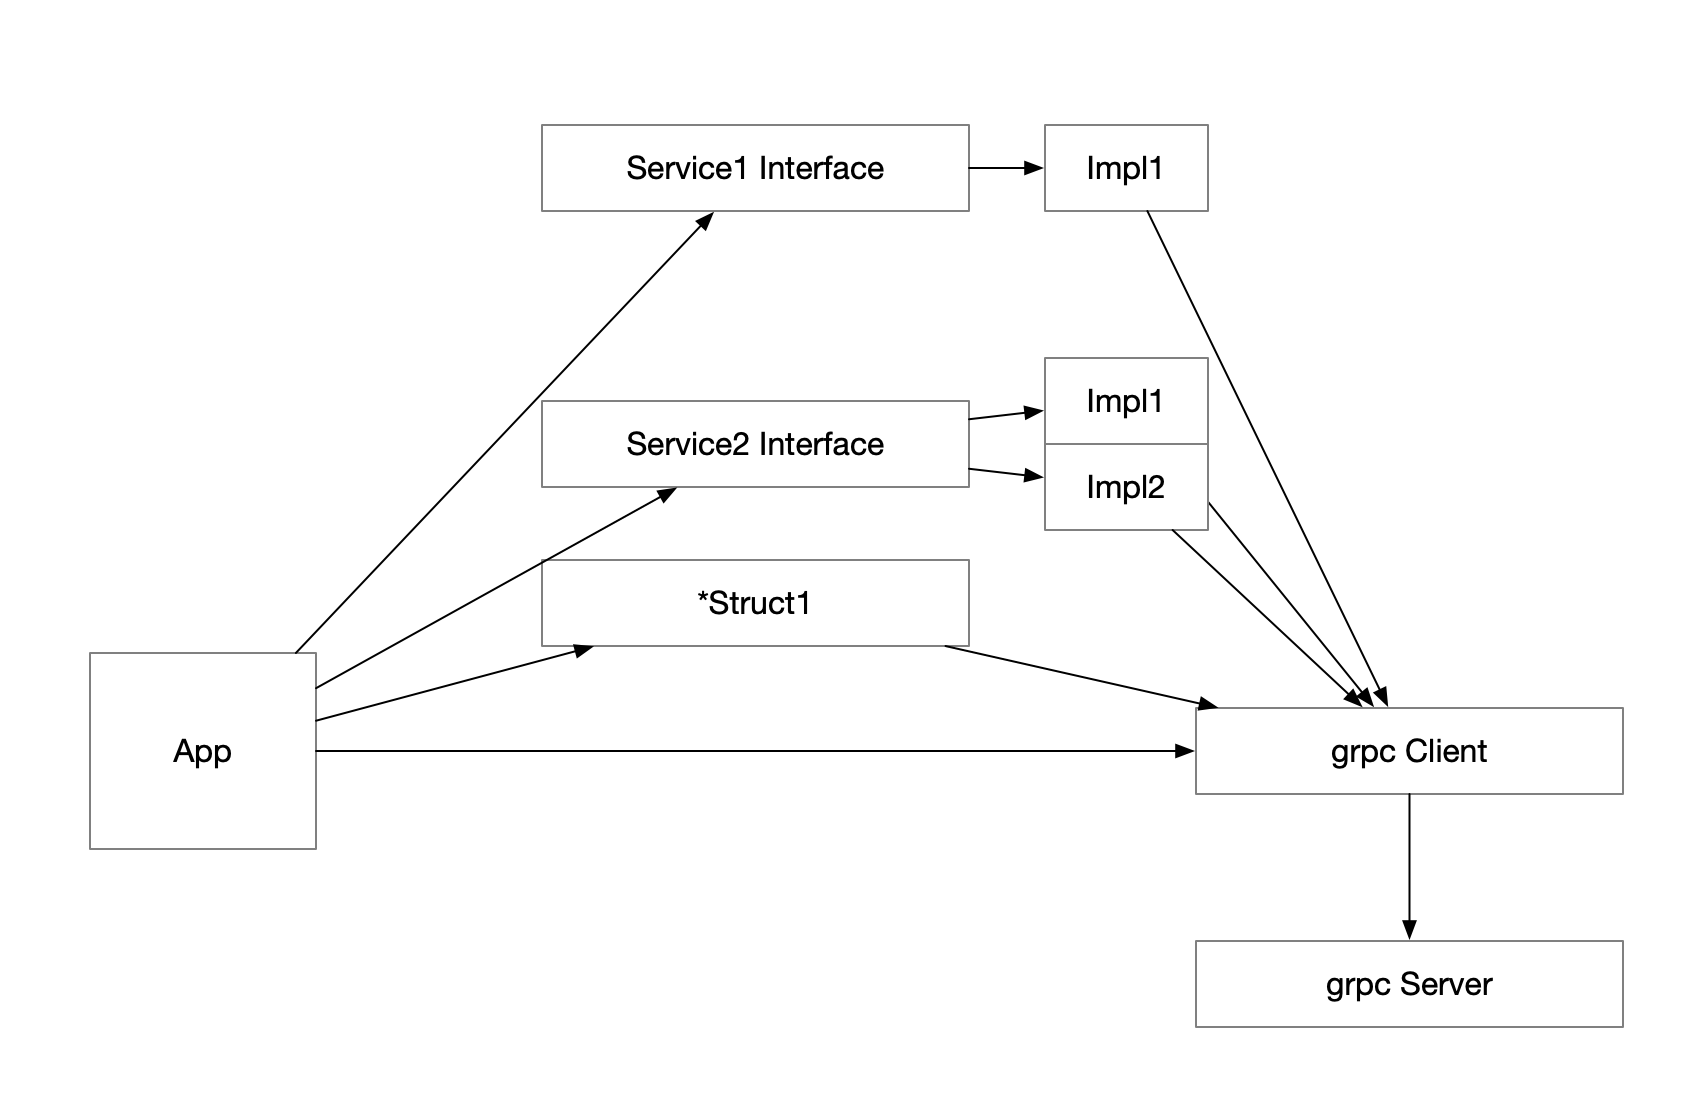
在这个例子中,App 结构会依此调用所有依赖对象,进而调用一个单例模型注入的 gRPC 客户端,该客户端发起网络请求,并获得结果。
依赖注入模型
关键代码
import(
  "github.com/alibaba/ioc-golang/extension/autowire/grpc"
	googleGRPC "google.golang.org/grpc"
)
func init() {
	// register grpc client
	grpc.RegisterStructDescriptor(&autowire.StructDescriptor{
		Interface: new(api.HelloServiceClient),
		Factory: func() interface{} {
			return new(api.HelloServiceClient)
		},
		ParamFactory: func() interface{} {
			return &googleGRPC.ClientConn{}
		},
		ConstructFunc: func(impl interface{}, param interface{}) (interface{}, error) {
			conn := param.(*googleGRPC.ClientConn)
			fmt.Println("create conn target ", conn.Target())
			return api.NewHelloServiceClient(conn), nil
		},
	})
}

// +ioc:autowire=true
// +ioc:autowire:type=singleton

type App struct {
	HelloServiceClient api.HelloServiceClient `grpc:"hello-service"`
}
需要在代码中手动注册 gRPC 客户端。在需要使用的地方,增加 grpc:"xxx" 标签
框架会默认从 autowire.grpc.xxx 读取参数, 在例子中,为autowire.grpc.hello-service
autowire:
  grpc:
    hello-service:
      address: localhost:8080
运行示例
启动 grpc Server
% cd example/denbug/grpc_server
% go run .
新开一个终端,启动客户端。
% cd example/autowire_grpc_client/cmd
% go run .
  ___    ___     ____            ____           _
 |_ _|  / _ \   / ___|          / ___|   ___   | |   __ _   _ __     __ _
  | |  | | | | | |      _____  | |  _   / _ \  | |  / _` | | '_ \   / _` |
  | |  | |_| | | |___  |_____| | |_| | | (_) | | | | (_| | | | | | | (_| |
 |___|  \___/   \____|          \____|  \___/  |_|  \__,_| |_| |_|  \__, |
                                                                    |___/
Welcome to use ioc-golang!
[Boot] Start to load ioc-golang config
[Config] Load config file from ../conf/ioc_golang.yaml
[Boot] Start to load debug
[Debug] Debug mod is not enabled
[Boot] Start to load autowire
[Autowire Type] Found registered autowire type grpc
[Autowire Struct Descriptor] Found type grpc registered SD github.com/alibaba/ioc-golang/example/autowire_grpc_client/api.HelloServiceClient
[Autowire Type] Found registered autowire type singleton
[Autowire Struct Descriptor] Found type singleton registered SD github.com/alibaba/ioc-golang/example/autowire_grpc_client/cmd/struct1.Struct1
[Autowire Struct Descriptor] Found type singleton registered SD main.App
[Autowire Struct Descriptor] Found type singleton registered SD github.com/alibaba/ioc-golang/example/autowire_grpc_client/cmd/service1.Impl1
[Autowire Struct Descriptor] Found type singleton registered SD github.com/alibaba/ioc-golang/example/autowire_grpc_client/cmd/service2.Impl1
[Autowire Struct Descriptor] Found type singleton registered SD github.com/alibaba/ioc-golang/example/autowire_grpc_client/cmd/service2.Impl2
create conn target  localhost:8080
App call grpc get: Hello laurence
ExampleService1Impl1 call grpc get :Hello laurence
ExampleService2Impl1 call grpc get :Hello laurence_service2_impl1
ExampleService2Impl2 call grpc get :Hello laurence_service2_impl2
ExampleStruct1 call grpc get :Hello laurence_service1_impl1
小节
gRPC 客户端注入能力,所代表的是 ioc-golang 框架具备网络模型注入的能力。
针对特定网络框架,可以在其服务提供者接口处,提供客户端注入代码,从而便于客户端引入后直接注入。
5 - 任务
5.1 - 电商系统搭建
项目仓库和介绍: ioc-golang/shopping-system
6 - 参考
6.1 - iocli 工具
iocli 源码位于 github.com/alibaba/IOC-golang/iocli ,是一款命令行工具,提供了以下能力:
代码调试
开发者可以使用 iocli 作为调试客户端,调试基于 ioc-golang 框架开发的 go 应用程序。
结构相关代码生成
开发者可以为需要依赖注入的结构体增加注解,iocli 会识别这些注解,并产生符合要求的结构相关代码。包括结构描述信息、结构代理层、结构专属接口、结构 Get 方法等。
调试能力
ioc-golang 框架拥有基于 AOP 的 Go 运行时程序调试能力,帮助故障排查,性能分析,提高应用可观测能力。在 快速开始 部分展示了接口信息的查看、参数监听能力。在 基于 IOC-golang 的电商系统demo 中,可以展示基于 ioc-golang 的,业务无侵入的,方法粒度全链路追踪能力。
注解与代码生成
注解 是以特定字符串开头的注释,标注在期望注入的结构前。注解 只具备静态意义,即在代码生成阶段,被 iocl i工具扫描识别到,从而获取结构相关信息。注解 本身不具备程序运行时的意义。
iocli 可以识别以下注解 key,其中 = 后面的 value 为示例。
// +ioc:autowire=true
// +ioc:autowire:type=normal
// +ioc:autowire:paramLoader=paramLoader
// +ioc:autowire:paramType=Config
// +ioc:autowire:constructFunc=New
// +ioc:autowire:baseType=true
// +ioc:autowire:alias=MyAppAlias
// +ioc:tx:func=MyTransactionFunction
ioc:autowire (必填)
bool 类型,为 true 则在代码生成阶段被识别到。
ioc:autowire:type (必填)
string类型,表示依赖注入模型,目前支持以下五种,结构提供者可以选择五种中的一种或多种进行标注,从而生成相关的结构信息与 API,供结构使用者选用。
// +ioc:autowire:type=singleton
// +ioc:autowire:type=normal

type MyStruct struct{

}
singleton
单例模型,使用该注入模型获取到的结构体,全局只存在一个对象。
normal
多例模型,使用该注入模型,每一个标签注入字段、每一次 API 获取,都会产生一个新的对象。
config:
配置模型是基于多例模型的封装扩展,基于配置模型定义的结构体方便从 yaml 配置文件中注入信息。参考例子 example/autowire/autowire_config
grpc:
grpc 模型是基于单例模型的封装扩展,基于 grpc 模型可以方便地从 yaml 配置文件中读取参数,生成 grpc 客户端。参考例子 example/third_party/autowire/grpc
rpc:
rpc 模型会在代码生成阶段产生 rpc 服务端注册代码,以及 rpc 客户端调用存根。参考例子 example/autowire/autowire_rpc
ioc:autowire:paramLoader(非必填)
string类型,表示需要定制的“参数加载器“类型名
参数加载器由结构定义者可选定制。可参考:extension/state/redis
参数加载器需要实现Load方法:
// ParamLoader is interface to load param
type ParamLoader interface {
 Load(sd *StructDescriptor, fi *FieldInfo) (interface{}, error)
}
定义结构的开发者可以通过实现参数加载器,来定义自己的结构初始化参数。例如,一个 redis 客户端结构 ‘Impl’,需要从Config 参数来加载,如下所示 New 方法。
type Config struct {
 Address  string
 Password string
 DB       string
}

func (c *Config) New(impl *Impl) (*Impl, error) {
 dbInt, err := strconv.Atoi(c.DB)
 if err != nil {
    return impl, err
 }
 client := redis.NewClient(&redis.Options{
    Addr:     c.Address,
    Password: c.Password,
    DB:       dbInt,
 })
 _, err = client.Ping().Result()
 if err != nil {
    return impl, err
 }
 impl.client = client
 return impl, nil
}
Config 包含的三个字段:Address Password DB,需要由使用者传入。
从哪里传入?这就是参数加载器所做的事情。
结构定义者可以定义如下加载器,从而将字段通过注入该结构的 tag 标签获取,如果tag信息标注了配置位置,则通过配置文件获取。
type paramLoader struct {
}

func (p *paramLoader) Load(sd *autowire.StructDescriptor, fi *autowire.FieldInfo) (interface{}, error) {
 splitedTagValue := strings.Split(fi.TagValue, ",")
 param := &Config{}
 if len(splitedTagValue) == 1 {
    return nil, fmt.Errorf("file info %s doesn't contain param infomration, create param from sd paramLoader failed", fi)
 }
 if err := config.LoadConfigByPrefix("extension.normal.redis."+splitedTagValue[1], param); err != nil {
    return nil, err
 }
 return param, nil
}
例如
type App struct {
 NormalDB3Redis normalRedis.Redis `normal:"github.com/alibaba/ioc-golang/extension/state/redis.Redis,address=127.0.0.1:6379&db=3"`
}
当然也可以从配置文件读入,tag中指定了key为 db1-redis
type App struct {
 NormalDB3Redis normalRedis.Redis `normal:"github.com/alibaba/ioc-golang/extension/state/redis.Redis,db1-redis"`
}
ioc-go.yaml: autowire.normal.Redis.Impl.db1-redis.param 读入参数
autowire:
  normal:
    github.com/alibaba/ioc-golang/extension/state/redis.Redis:
      db1-redis:
        param:
          address: localhost:6379
          db: 1
我们提供了预置的参数加载器
除非用户有强烈需求,我们更推荐用户直接使用我们预置的参数加载器:http://github.com/alibaba/ioc-golang/tree/master/autowire/param_loader。
我们会先后尝试:标签重定向到配置、标签读入参数、配置文件的默认位置读入参数。每个注册到框架的结构都有唯一的ID,因此也会在配置文件中拥有配置参数的位置,这一默认位置在这里定义:http://github.com/alibaba/ioc-golang/blob/master/autowire/param_loader/default_config.go#L21,我们更希望和用户约定好这一点。
当所有加载器都加载参数失败后,将会抛出错误。使用者应当查阅自己引入的结构加载器实现,并按照要求配置好参数。
ioc:autowire:paramType(非必填)
string类型,表示依赖参数的类型名,在上述例子,该类型名为 Config
ioc:autowire:constructFunc(非必填)
string类型,表示结构的构造方法名
在给出 ioc:autowire:paramType 参数类型名的情况下,会使用参数的函数作为构造函数,例如在上述例子中,该构造方法为 Config 对象的 New 方法。
如果没有给出 ioc:autowire:paramType 参数类型名,则会直接使用这一方法作为构造函数。
我们要求该构造方法的函数签名是固定的,即:
func (*$(结构名)) (*$(结构名), error)ioc:autowire:baseType=true (非必填)
该类型是否为基础类型
go 基础类型不可直接通过&在构造时取地址,因此我们针对基础类型单独设计了该注解。在 配置扩展 中被使用较多。
ioc:autowire:alias=MyAppAlias (非必填)
该类型的别名,可在标签、API获取、配置中,通过该别名替代掉较长的类型全名来指定结构。
ioc:tx:func=MyTransactionFunction(非必填)
指定事务函数和回滚函数,参考事务例子 example/aop/transaction
iocli 操作命令
iocli init生成初始化工程
iocli gen递归遍历当前目录下的所有 go pkg ,根据注解生成结构体相关代码。
iocli list查看应用所有接口和方法信息,默认端口 :1999
iocli watch [structID] [methodName]监听一个方法的实时调用信息
iocli monitor [structID] [methodName]开启调用监控,structID 和 methodName 可不指定,则监控所有接口方法。
iocli trace [structID] [methodName]以当前方法为入口,开启调用链路追踪
具体操作参数可通过 -h 查看。
6.2 - 注入标签格式规范
IOC-golang 依赖 Go 原生支持的字段标签来作为依赖注入标签,标签的格式定义如下
拥有注入标签的结构,必须要在 ioc 框架的管理下才能正确注入,因此需要在结构体上方增加注解 +ioc:autowire ...=
// +ioc:autowire=true
// +ioc:autowire:type=singleton

type DemoStruct struct{
  ${大写字母开头的字段名} ${字段类型} `${自动装载模型}:"${结构ID},${结构key}或${参数字段1}=${参数值1}&..."`
}
${字段类型}
其中${字段类型} 可有如下选择
接口
结构专属接口已经包含了结构ID信息,其标签内
${结构ID}为空即可。开发者提供的接口
由于结构专属接口与结构体实现处在同一 pkg 下,如果期望通过依赖注入进行接口-实现分离,则需要由开发者给出接口,同时必须给出期望注入的
${结构ID}。并保证程序在任何位置引入了实现类pkg,保证在程序启动时,期望注入的结构可被注册,从而被框架所管理,完成注入逻辑。
结构体指针。
结构体指针已经包含了结构ID信息,其标签内
${结构ID}为空即可。
${自动装载模型}
内置:autowire, normal, grpc, rpc-client, config
如开发者提供了 扩展的自动装载模型,也可以在这里指定。
${结构ID}
结构ID字符串,参考 结构ID。
如注入字段的 ${字段类型} 为结构体指针或者 结构专属接口,${结构ID} 为空即可。
${结构key}或${参数字段1}=${参数值1}&…
指定构造参数的值
- 如果为多例模型,在此位置指定结构key,参考 默认配置格式与参数加载位置 中的例子
- 如果在此位置给出
${参数字段1}=${参数值1}&${参数字段2}=${参数值2}则会以此处的参数值构造依赖对象并注入。参数值可以从配置文件中读取,也可以从环境变量中读取,一个复杂的例子如下:
参考 example/third_party/state/redis
// +ioc:autowire=true
// +ioc:autowire:type=singleton
// +ioc:autowire:paramType=Param
// +ioc:autowire:constructFunc=Init
// +ioc:autowire:alias=AppAlias

type App struct {
	NormalRedis    normalRedis.RedisIOCInterface `normal:""` // 配置文件默认位置加载参数
	NormalDB1Redis normalRedis.RedisIOCInterface `normal:",db1-redis"` // 配置文件当前结构的索引 db1-redis 位置加载参数
	NormalDB2Redis normalRedis.RedisIOCInterface `normal:",db2-redis"` // 配置文件当前结构的索引 db2-redis 位置加载参数
	NormalDB3Redis normalRedis.RedisIOCInterface `normal:",address=127.0.0.1:6379&db=3"` // 直接给出静态参数
	NormalDB4Redis normalRedis.RedisIOCInterface `normal:",address=${REDIS_ADDRESS_EXPAND}&db=5"`  // 从环境变量中读取参数
	NormalDB5Redis normalRedis.RedisIOCInterface `normal:",address=${autowire.normal.<github.com/alibaba/ioc-golang/extension/state/redis.Redis>.nested.address}&db=15"`  // 从配置文件的给定位置中读取参数

	privateClient *redis.Client
}
其配置文件如下:
autowire:
  normal:
    github.com/alibaba/ioc-golang/extension/state/redis.Redis:
      db1-redis:
        param: # NormalDB1Redis 读取参数位置
          address: localhost:6379
          db: 1
      db2-redis: # NormalDB2Redis 读取参数位置
        param:
          address: localhost:6379
          db: 2
      param: # NormalRedis 读取参数位置
        address: localhost:6379
        db: 0
      expand:
        address: ${REDIS_ADDRESS_EXPAND}
        db: 15
      nested: # NormalDB5Redis 读取参数位置
        address: ${autowire.normal.<github.com/alibaba/ioc-golang/extension/state/redis.Redis>.expand.address}
        db: ${autowire.normal.<github.com/alibaba/ioc-golang/extension/state/redis.Redis>.expand.db}
6.3 - 配置文件格式规范
默认配置格式与参数加载位置
配置文件 ioc_golang.yaml 的默认参数默认配置格式为:
autowire:
  ${自动装载模型名}:
    ${SDID}:
      ${多例模式下的索引key1}:
        param:
          field1: value1 # 多例模式创建对象的构造参数
      ${多例模式下的索引key2}:
        param:
          field1: value2 # 多例模式创建对象的构造参数
      param:
        field1: value3 # 单例模式或多例模式未指定索引key 创建对象的构造参数
例如,一个基于多例模型的结构 Impl,实现了 Redis 接口,其多个实例参数可以配置为:
autowire:
  normal:
    github.com/alibaba/ioc-golang/extension/normal/redis.Impl:
      db1-redis:
        param:
          address: localhost:6379
          db: 1
      db2-redis:
        param:
          address: localhost:6379
          db: 2
      param:
        address: localhost:6379
        db: 0
拥有 注入标签 normal:",db2-redis" 的字段,会从配置中读入参数,位置为标签指向的对象名db2-redis,db 为2。
NormalDB2Redis normalRedis.RedisIOCInterface `normal:",db2-redis"`

address: localhost:6379
db: 2
拥有标签 normal:"" 的字段,会从配置中读入参数,db 为 0。
NormalDBRedis normalRedis.RedisIOCInterface `normal:""`

address: localhost:6379
db: 0
定制化参数加载器
参数加载器(param_loader) 可以在自动装载模型或 SD (结构描述符) 中定制化,例如一个基于 grpc 自动装载模型注入的客户端,我们已经在 grpc 自动装载模型中 定制化 了参数加载位置,为 autowire.grpc.${tag-value} ,因此对于如下字段:
HelloServiceClient api.HelloServiceClient `grpc:"hello-service"`
会从如下位置读取参数:address 设置为 “localhost:8080”
autowire:
  grpc:
    hello-service:
      address: localhost:8080
同理,也可以由服务提供者在 SD 中传入参数加载器,进行定制化参数加载源。
配置文件中的特殊引用
声明环境变量
在配置文件中,可以使用 ${ENV_KEY} 的格式,引入环境变量。当环境变量存在时,将会被替换为环境变量的值。
config:
  app:
    config-value: myValue
    config-value-from-env: ${MY_CONFIG_ENV_KEY} # 如环境变量存在,读取环境变量替换该字段
声明配置引用(nested)
config:
  app:
    config-value: myValue
    config-value-from-env: ${MY_CONFIG_ENV_KEY}  # 如环境变量存在,读取环境变量替换该字段
    nested-config-value: ${config.app.config-value} # 引用 config.app.config-value 的值,为 myValue
    nested-config-value-from-env: ${config.app.config-value-from-env} # 引用 config.app.config-value-from-env 的值,为环境变量替换后的值
更多配置文件的加载与使用例子,参考 example/config_file
6.4 - 常见问题排查
默认配置层级
配置文件 ioc_golang.yaml 的默认参数默认配置层级依此为:
autowire:
  $(自动装载模型名):
    $(SDID):
      $(多例模式下的对象名):
        param:
      param:
例如,一个基于多例模型的结构 Impl,实现了 Redis 接口,其多个实例参数可以配置为:
autowire:
  normal:
    github.com/alibaba/ioc-golang/extension/normal/redis.Impl:
        db1-redis:
          param:
            address: localhost:6379
            db: 1
        db2-redis:
          param:
            address: localhost:6379
            db: 2
        param:
          address: localhost:6379
          db: 0
拥有标签 normal:"Impl,db2-redis" 的字段,会从配置中读入参数,位置为标签指向的对象名db2-redis
NormalDB2Redis normalRedis.Redis `normal:"Impl,db2-redis"`

address: localhost:6379
db: 2
拥有标签 normal:"Impl" 的字段,会从配置中读入参数。
NormalDBRedis normalRedis.Redis `normal:"Impl"`
address: localhost:6379
db: 0
定制化参数加载模型
参数加载模型可以由自动装载模型和 SD (结构描述符)定制化,例如一个基于 grpc 自动装载模型注入的客户端
HelloServiceClient api.HelloServiceClient `grpc:"hello-service"`
从如下位置读取参数:
autowire:
  grpc:
    hello-service:
      address: localhost:8080
7 - 开发者文档
ioc-golang 全面拥抱可扩展性,我们希望您在框架内接触到的任何概念都是可横向扩展的。可扩展性不意味着任何事情都要手动编写,而是在拥有足够预置实现方案的基础之上,支持针对特殊场景的定制化。如果您的方案足够通用,也可以提交至开源侧,让更多人可以享受你的方案带来的便利。
ioc-golang 的可扩展性体现在多个方面,其中最重要的是依赖注入过程的可扩展性,这也是框架能的核心能力。
依赖注入 的可扩展性
包含三个维度,从具体到抽象分别是:
对象的可扩展性
对象的可扩展性,即针对确定的一个结构(非单例),你可以通过传入不同的参数来获取多个期望的对象。这个过程往往被结构使用者关注,他需要思考如何传入参数,获得对象,调用对象从而实现正确的业务逻辑。通过这一可扩展性,结构使用者可以扩展出多个对象实例。
结构的可扩展性
结构的可扩展性,即针对一个确定的 自动装载模型,你可以通过定义自己的结构描述信息,将你的结构体注册在框架上,以供使用。这个过程是结构提供者关心的,他需要思考选用哪个自动装载模型,思考提供的结构的全部生命周期信息。通过这一可扩展性,结构提供者可以为框架注入多种多样的结构,这些结构都会按照被选择的自动装载模型执行加载逻辑。
框架提供了一些预置的结构,例如 redis 客户端、gorm客户端等等,开发者可以直接传入参数,注入或通过API获取,直接使用,但这些预置的结构一定无法覆盖业务需求的。开发者注册自己的任何结构到框架上,都是使用了结构的可扩展性,这些被注册的结构和框架提供的预置结构,都是同一层面的概念。
自动装载模型 的可扩展性
自动装载模型描述了一类结构的装载方式,例如是否单例模型、参数从哪里加载、注入标签应该符合什么格式等等。这个过程也是结构提供者关心的。
框架提供了一些预置的自动装载模型,例如单例模型、多例模型、配置模型、rpc 模型等,开发者可以根据按照业务需要,将一个或多个结构注册在期望的自动装载模型上,当已有的自动装载模型不足以适配业务场景,开发者可以调用API进行定制化
AOP 实现 的可扩展性
函数调用拦截器 的可扩展性
RPC 调用拦截器 的可扩展性
Debug 端口 gRPC 服务 、iocli 工具命令的可扩展性
7.1 - 项目结构
- aop: 结构代理 AOP 模块:提供 AOP 代理层的基础能力,和可扩展API。
- autowire: 提供依赖注入内核,以及单例模型、多例模型两种基本自动装载模型
- config: 配置加载模块,负责解析框架配置文件。
- extension: 组件扩展:提供基于多个领域模型的的预置实现结构,比如缓存、数据库、消息。
- example: 示例
- iocli: 代码生成/程序调试 工具