实现依赖注入demo
使用 ioc-golang 实现依赖注入demo
教程

依赖注入和调试教程演示
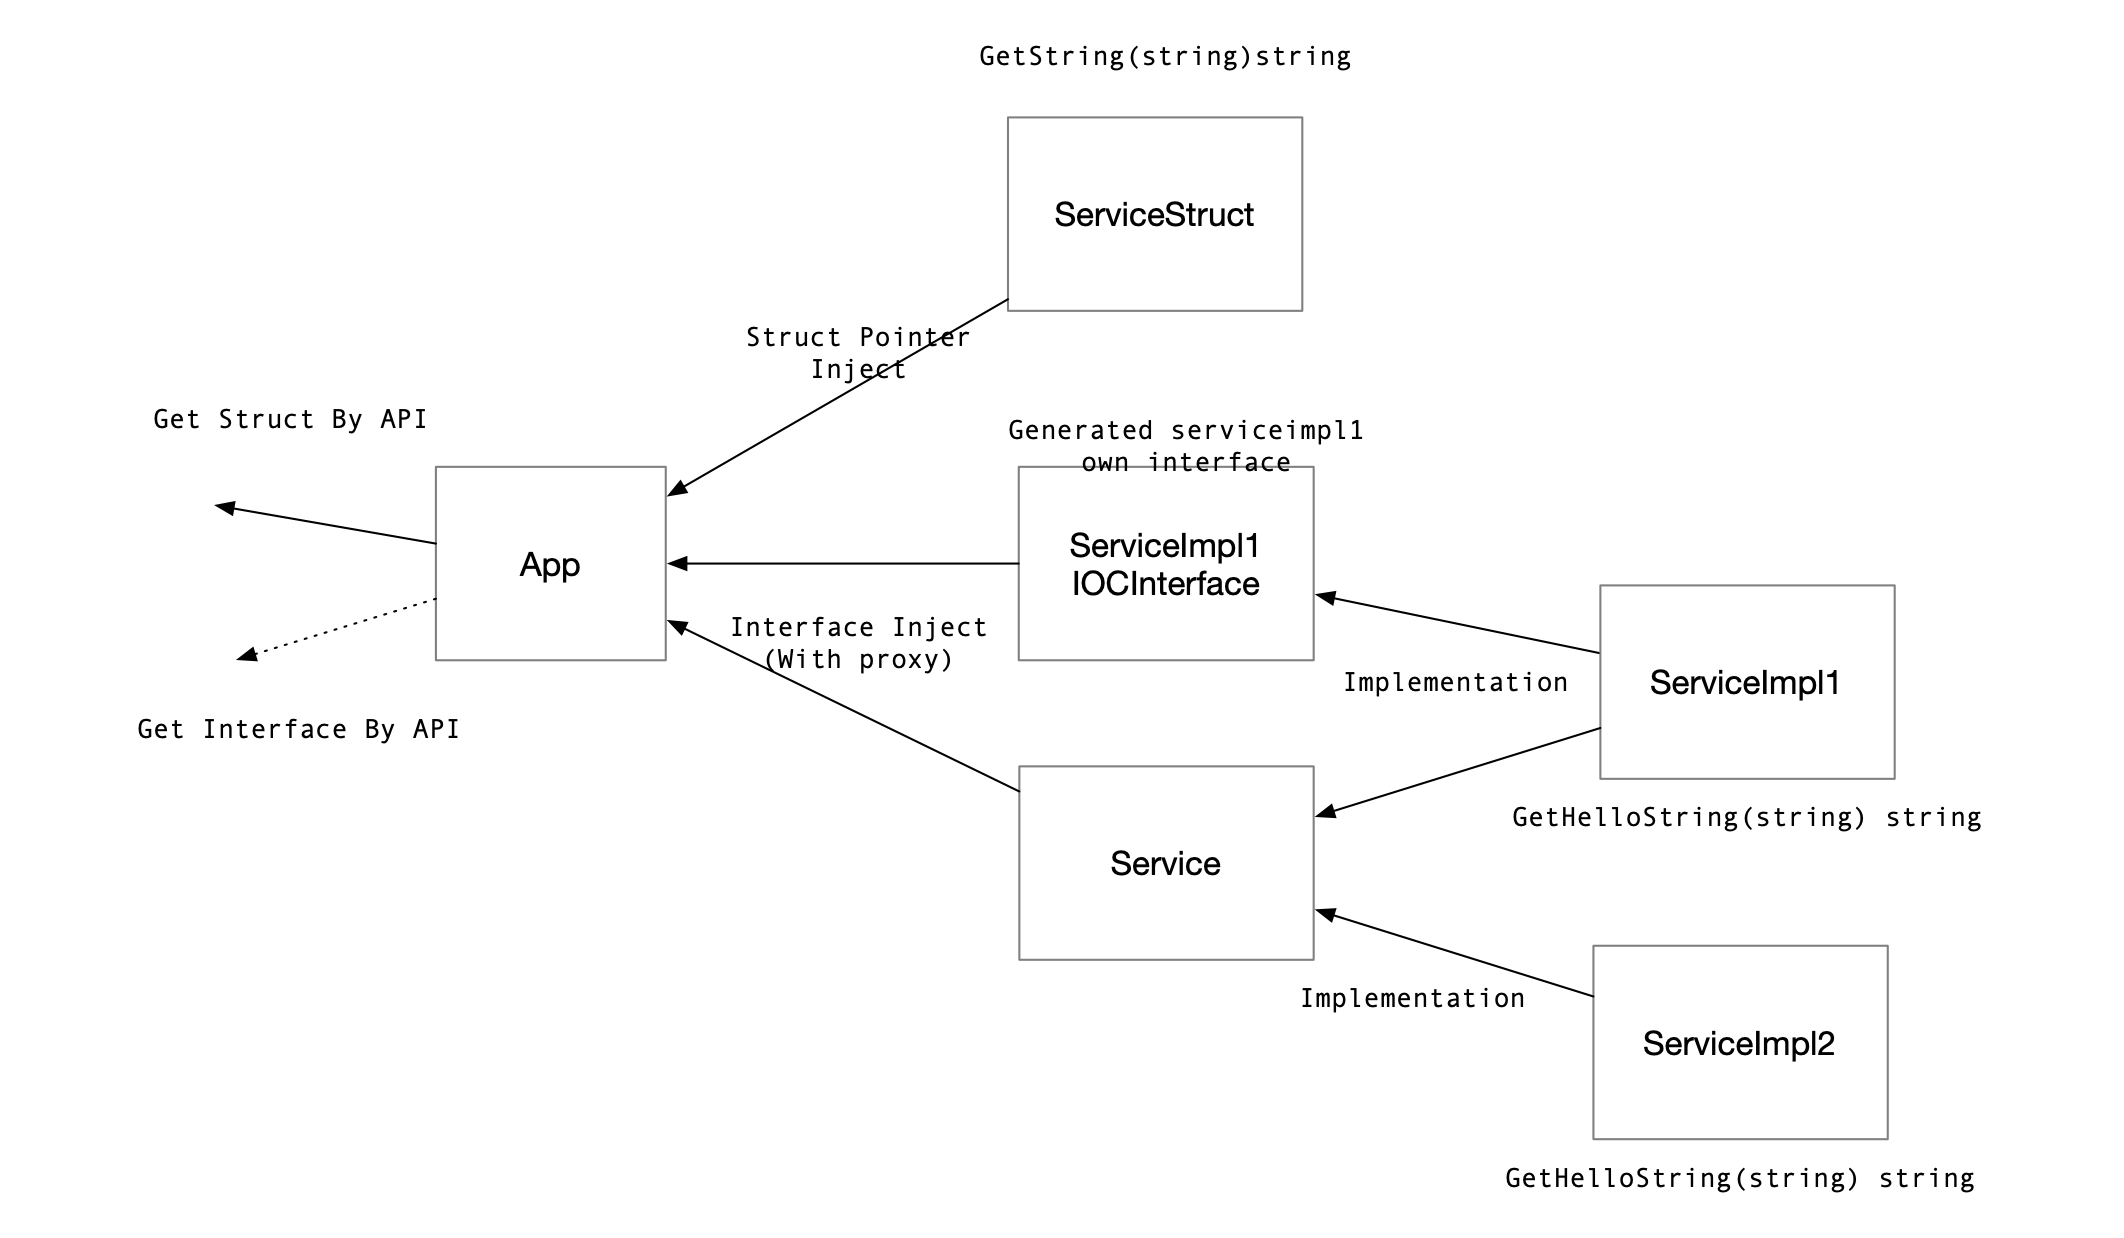
我们将开发一个具有以下拓扑的工程,在本例子中,可以展示
- 注册代码生成
- 接口注入
- 对象指针注入
- API 获取对象
- 调试能力,查看运行中的接口、方法;以及实时监听参数值、返回值。

用户所需编写的全部代码:main.go
package main

import (
	"fmt"
	"time"

	"github.com/alibaba/ioc-golang"
)

// +ioc:autowire=true
// +ioc:autowire:type=singleton

type App struct {
	// 将封装了代理层的 main.ServiceImpl1 指针注入到 Service 接口,单例模型,需要在标签中指定被注入结构
	ServiceImpl1 Service `singleton:"main.ServiceImpl1"`

	// 将封装了代理层的 main.ServiceImpl2 指针注入到 Service 接口,单例模型,需要在标签中指定被注入结构
	ServiceImpl2 Service `singleton:"main.ServiceImpl2"`

	// 将封装了代理层的 main.ServiceImpl1 指针注入到他的专属接口 'ServiceImpl1IOCInterface'
  // 注入专属接口的命名规则是 '${结构名}IOCInterface',注入专属接口无需指定被注入结构,标签值为空即可。
	Service1OwnInterface ServiceImpl1IOCInterface `singleton:""`

	// 将结构体指针注入当前字段
	ServiceStruct *ServiceStruct `singleton:""`
}

func (a *App) Run() {
	for {
		time.Sleep(time.Second * 3)
		fmt.Println(a.ServiceImpl1.GetHelloString("laurence"))
		fmt.Println(a.ServiceImpl2.GetHelloString("laurence"))

		fmt.Println(a.Service1OwnInterface.GetHelloString("laurence"))

		fmt.Println(a.ServiceStruct.GetString("laurence"))
	}
}

type Service interface {
	GetHelloString(string) string
}

// +ioc:autowire=true
// +ioc:autowire:type=singleton

type ServiceImpl1 struct {
}

func (s *ServiceImpl1) GetHelloString(name string) string {
	return fmt.Sprintf("This is ServiceImpl1, hello %s", name)
}

// +ioc:autowire=true
// +ioc:autowire:type=singleton

type ServiceImpl2 struct {
}

func (s *ServiceImpl2) GetHelloString(name string) string {
	return fmt.Sprintf("This is ServiceImpl2, hello %s", name)
}

// +ioc:autowire=true
// +ioc:autowire:type=singleton

type ServiceStruct struct {
}

func (s *ServiceStruct) GetString(name string) string {
	return fmt.Sprintf("This is ServiceStruct, hello %s", name)
}

func main() {
	// start
	if err := ioc.Load(); err != nil {
		panic(err)
	}

	// app, err := GetAppIOCInterface 也可以,获取到的是封装了代理层的接口,如下获取到的是未封装的结构体指针。
	app, err := GetApp()
	if err != nil {
		panic(err)
	}
	app.Run()
}
上述所说的“代理层”,是框架为“以接口形式注入/获取”的结构体,默认封装的代理,可以扩展一系列运维操作。我们推荐开发者在编写代码的过程中基于接口编程,则所有对象都可拥有运维能力。
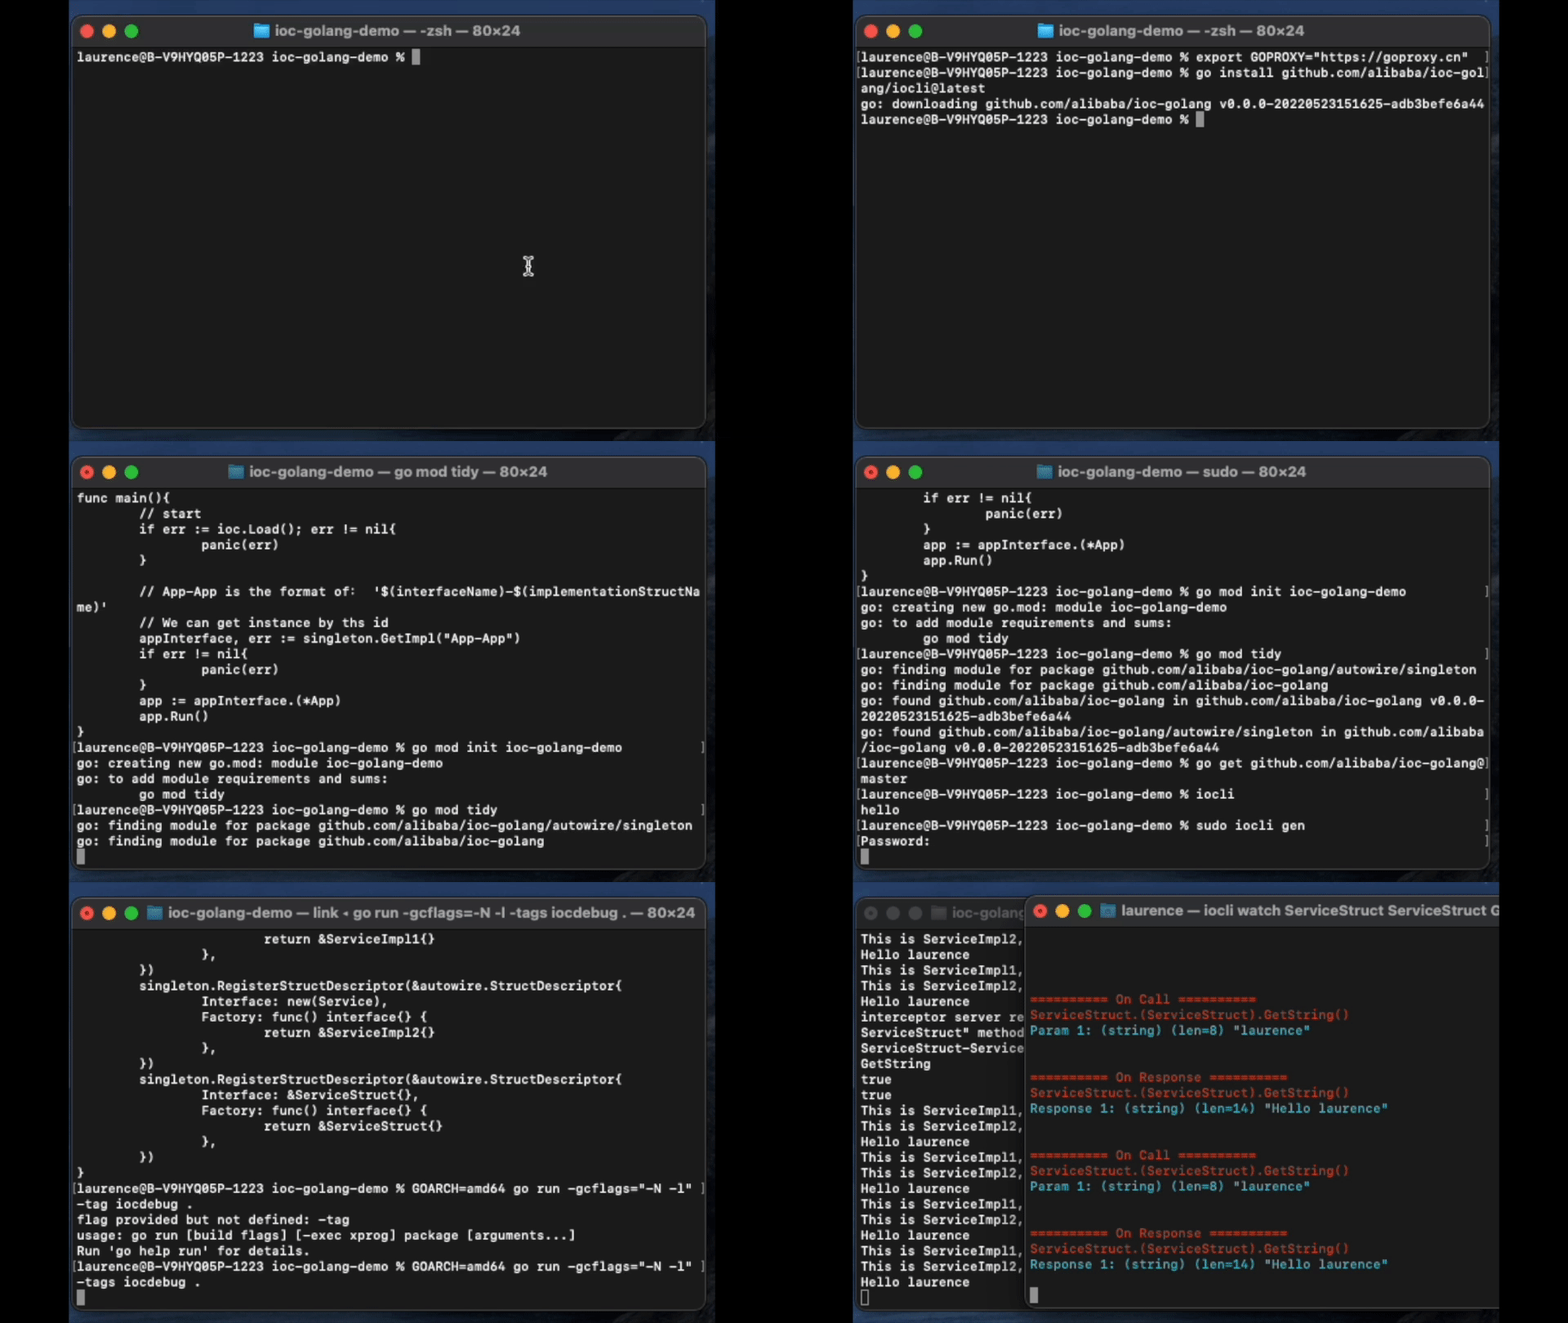
编写完毕后,当前目录执行以下命令,初始化 go mod ,拉取最新代码,生成结构注册代码。(mac 环境可能因权限原因需要sudo):
% go mod init ioc-golang-demo
% export GOPROXY="https://goproxy.cn"
% go mod tidy
% go get github.com/alibaba/ioc-golang@master
% sudo iocli gen
会在当前目录生成:zz_generated.ioc.go,开发者无需关心这一文件,这一文件中就包含了上面使用的 GetApp 方法
//go:build !ignore_autogenerated
// +build !ignore_autogenerated

// Code generated by iocli

package main

import (
        autowire "github.com/alibaba/ioc-golang/autowire"
        normal "github.com/alibaba/ioc-golang/autowire/normal"
        "github.com/alibaba/ioc-golang/autowire/singleton"
        util "github.com/alibaba/ioc-golang/autowire/util"
)

func init() {
        normal.RegisterStructDescriptor(&autowire.StructDescriptor{
                Factory: func() interface{} {
                        return &app_{}
                },
        })
        singleton.RegisterStructDescriptor(&autowire.StructDescriptor{
                Factory: func() interface{} {
                        return &App{}
                },
        })
  ...
func GetServiceStructIOCInterface() (ServiceStructIOCInterface, error) {
        i, err := singleton.GetImplWithProxy(util.GetSDIDByStructPtr(new(ServiceStruct)), nil)
        if err != nil {
                return nil, err
        }
        impl := i.(ServiceStructIOCInterface)
        return impl, nil
}
查看当前目录文件
% tree
.
├── go.mod
├── go.sum
├── main.go
└── zz_generated.ioc.go

0 directories, 4 files
执行程序
go run .
控制台打印输出:
  ___    ___     ____                           _
 |_ _|  / _ \   / ___|           __ _    ___   | |   __ _   _ __     __ _
  | |  | | | | | |      _____   / _` |  / _ \  | |  / _` | | '_ \   / _` |
  | |  | |_| | | |___  |_____| | (_| | | (_) | | | | (_| | | | | | | (_| |
 |___|  \___/   \____|          \__, |  \___/  |_|  \__,_| |_| |_|  \__, |
                                |___/                               |___/
Welcome to use ioc-golang!
[Boot] Start to load ioc-golang config
[Config] Load default config file from ../conf/ioc_golang.yaml
[Config] Load ioc-golang config file failed. open /Users/laurence/Desktop/workplace/alibaba/conf/ioc_golang.yaml: no such file or directory
 The load procedure is continue
[Boot] Start to load debug
[Debug] Debug port is set to default :1999
[Boot] Start to load autowire
[Autowire Type] Found registered autowire type normal
[Autowire Struct Descriptor] Found type normal registered SD main.serviceStruct_
[Autowire Struct Descriptor] Found type normal registered SD main.app_
[Autowire Struct Descriptor] Found type normal registered SD main.serviceImpl1_
[Autowire Struct Descriptor] Found type normal registered SD main.serviceImpl2_
[Autowire Type] Found registered autowire type singleton
[Autowire Struct Descriptor] Found type singleton registered SD main.App
[Autowire Struct Descriptor] Found type singleton registered SD main.ServiceImpl1
[Autowire Struct Descriptor] Found type singleton registered SD main.ServiceImpl2
[Autowire Struct Descriptor] Found type singleton registered SD main.ServiceStruct
[Debug] Debug server listening at :1999
This is ServiceImpl1, hello laurence
This is ServiceImpl2, hello laurence
This is ServiceImpl1, hello laurence
This is ServiceStruct, hello laurence
...
可看到,依赖注入成功,程序正常运行。
调试程序
可看到打印出的日志中包含,说明 Debug 服务已经启动。
[Debug] Debug server listening at :1999
新开一个终端,使用 iocli 的调试功能,查看所有拥有代理层的结构和方法。默认端口为 1999。
% iocli list
main.ServiceImpl1
[GetHelloString]

main.ServiceImpl2
[GetHelloString]
监听方法的参数和返回值。以监听 main.ServiceImpl 结构的 GetHelloString 方法为例,每隔三秒钟,函数被调用两次,打印参数和返回值。
% iocli watch main.ServiceImpl1 GetHelloString
========== On Call ==========
main.ServiceImpl1.GetHelloString()
Param 1: (string) (len=8) "laurence"

========== On Response ==========
main.ServiceImpl1.GetHelloString()
Response 1: (string) (len=36) "This is ServiceImpl1, hello laurence"

========== On Call ==========
main.ServiceImpl1.GetHelloString()
Param 1: (string) (len=8) "laurence"

========== On Response ==========
main.ServiceImpl1.GetHelloString()
Response 1: (string) (len=36) "This is ServiceImpl1, hello laurence"
,,,
注解分析
// +ioc:autowire=true
代码生成工具会识别到标有 +ioc:autowire=true 注解的对象

// +ioc:autowire:type=singleton
标记注入模型为 singleton 单例模型,还有 normal 多例模型等扩展
更多
您可以参阅 示例 查阅更多例子和框架高级用法
Feedback
Was this page helpful?
Glad to hear it! Please tell us how we can improve.
Sorry to hear that. Please tell us how we can improve.
Last modified June 21, 2022: Fix: remove unused file (0fc728c)