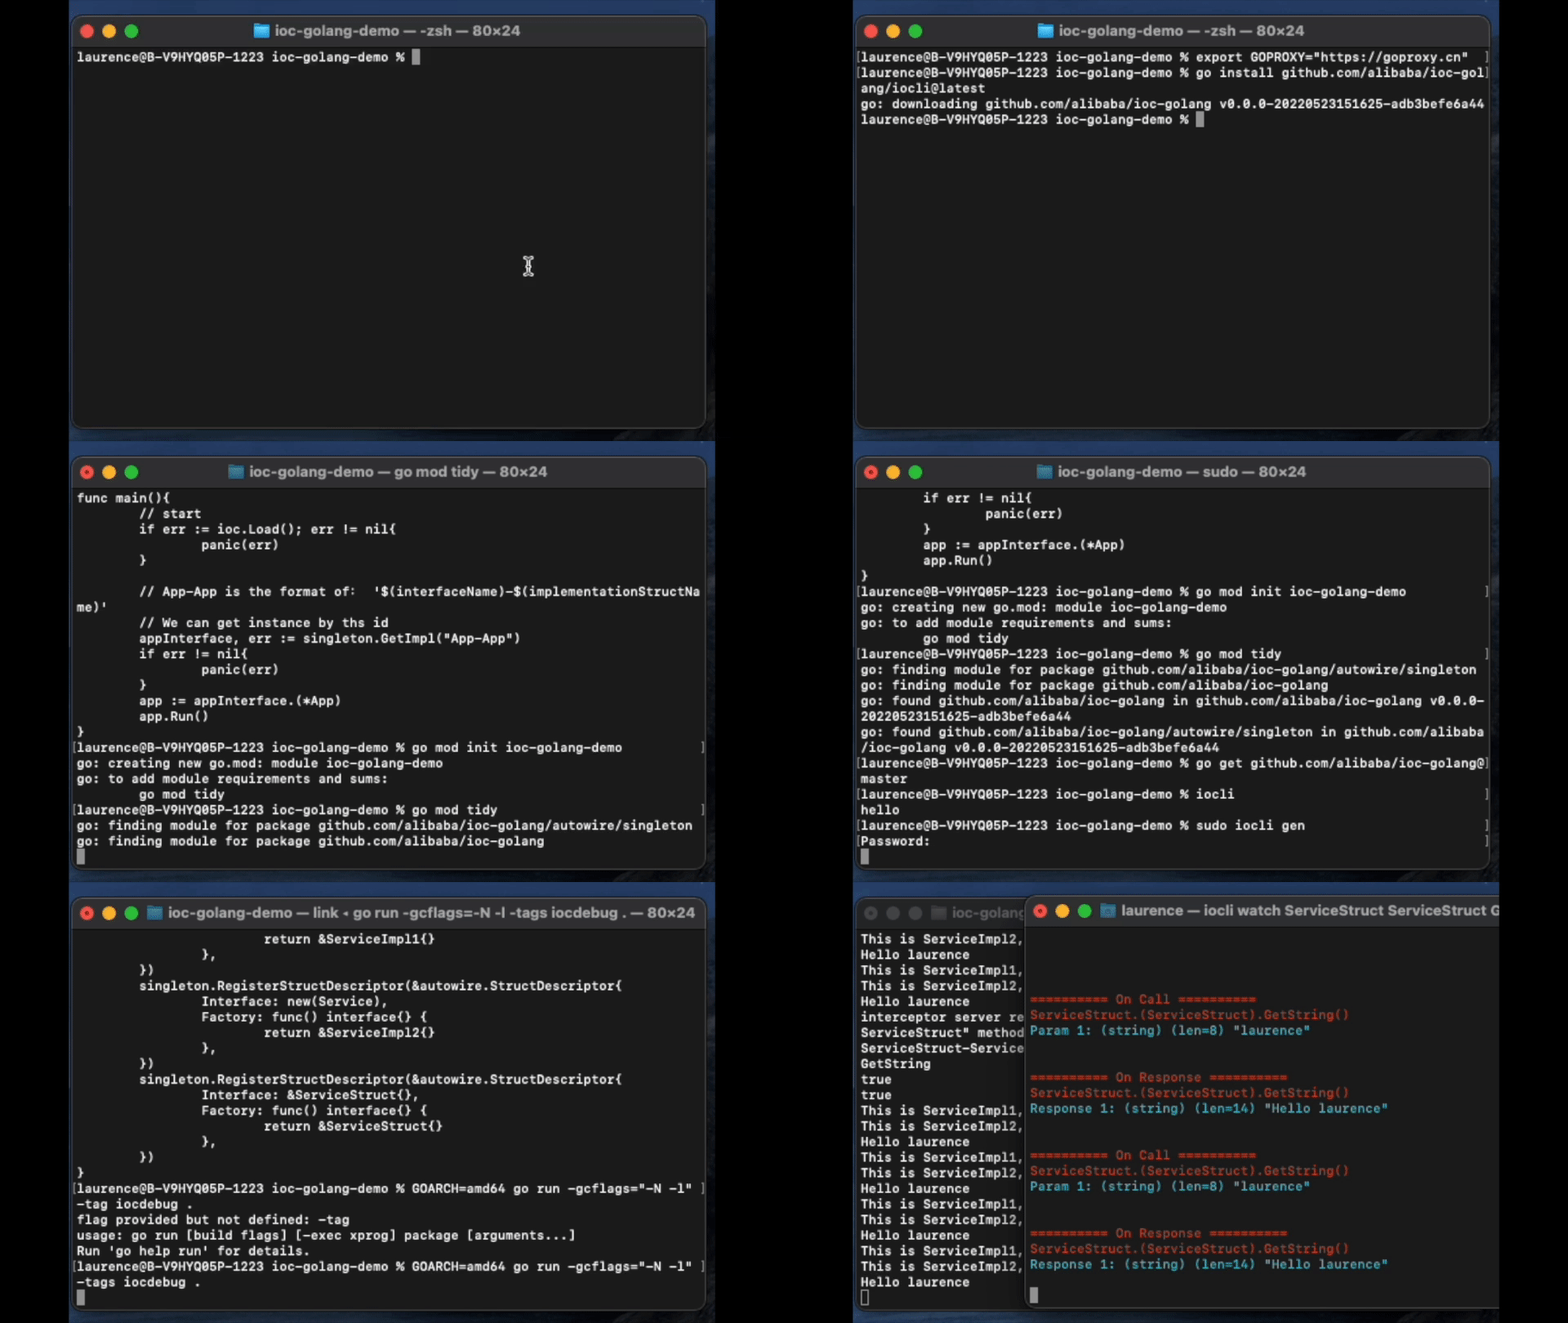
1 - 环境安装
安装 Go 环境
建议 go version >= 1.17
将 $GOPATH/bin 加入环境变量
安装 iocli 代码生成工具至 $GOPATH/bin
go install github.com/alibaba/ioc-golang/iocli@latest
2 - 实现依赖注入demo
使用 ioc-golang 实现依赖注入demo
教程

依赖注入和调试教程演示
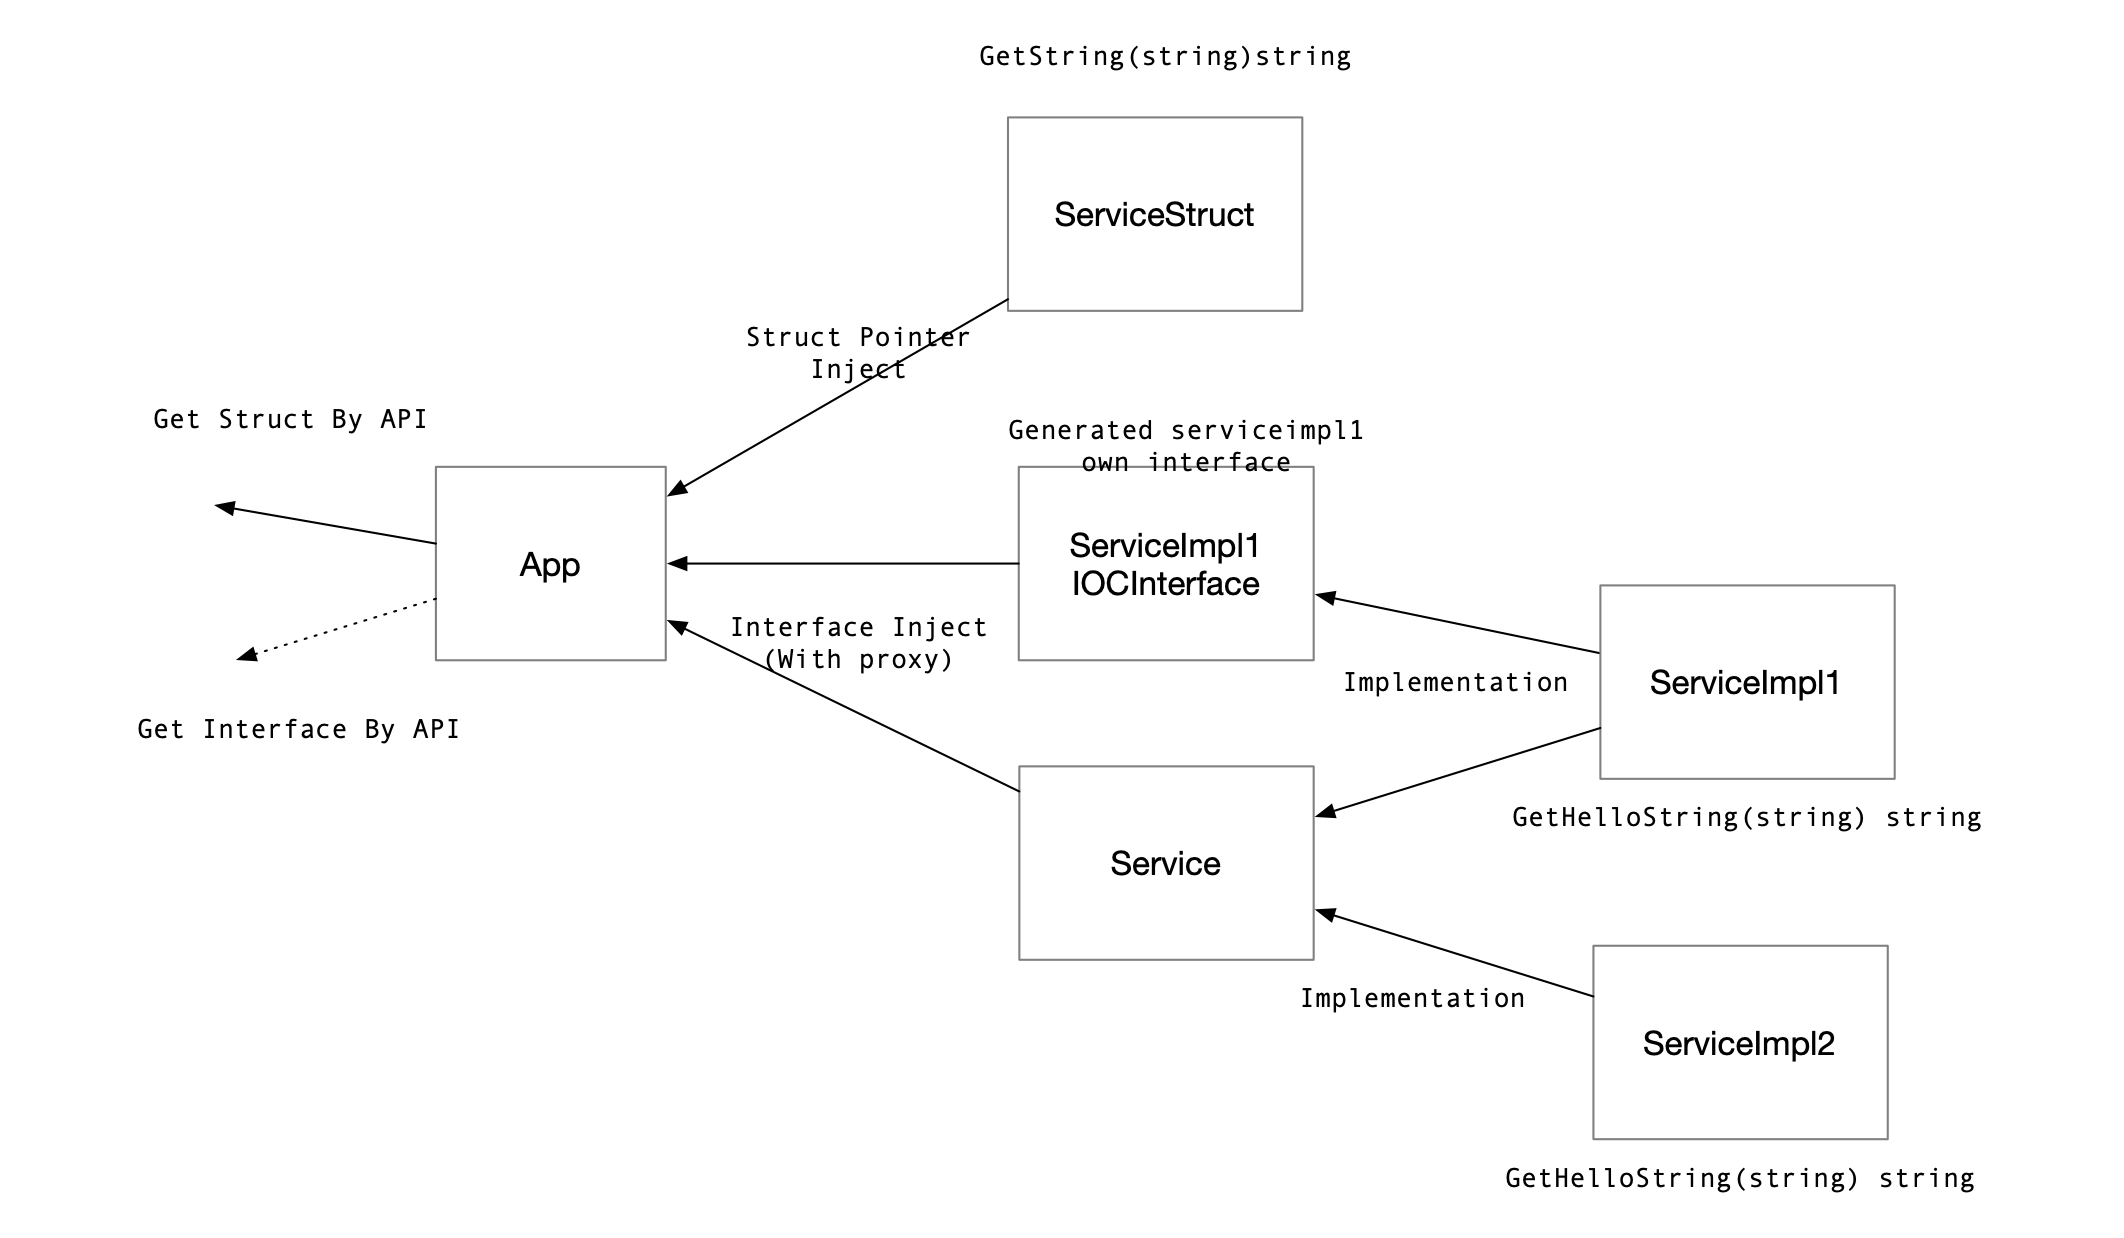
我们将开发一个具有以下拓扑的工程,在本例子中,可以展示
- 注册代码生成
- 接口注入
- 对象指针注入
- API 获取对象
- 调试能力,查看运行中的接口、方法;以及实时监听参数值、返回值。

用户所需编写的全部代码:main.go
package main

import (
	"fmt"
	"time"

	"github.com/alibaba/ioc-golang"
)

// +ioc:autowire=true
// +ioc:autowire:type=singleton

type App struct {
	// 将封装了代理层的 main.ServiceImpl1 指针注入到 Service 接口,单例模型,需要在标签中指定被注入结构
	ServiceImpl1 Service `singleton:"main.ServiceImpl1"`

	// 将封装了代理层的 main.ServiceImpl2 指针注入到 Service 接口,单例模型,需要在标签中指定被注入结构
	ServiceImpl2 Service `singleton:"main.ServiceImpl2"`

	// 将封装了代理层的 main.ServiceImpl1 指针注入到他的专属接口 'ServiceImpl1IOCInterface'
  // 注入专属接口的命名规则是 '${结构名}IOCInterface',注入专属接口无需指定被注入结构,标签值为空即可。
	Service1OwnInterface ServiceImpl1IOCInterface `singleton:""`

	// 将结构体指针注入当前字段
	ServiceStruct *ServiceStruct `singleton:""`
}

func (a *App) Run() {
	for {
		time.Sleep(time.Second * 3)
		fmt.Println(a.ServiceImpl1.GetHelloString("laurence"))
		fmt.Println(a.ServiceImpl2.GetHelloString("laurence"))

		fmt.Println(a.Service1OwnInterface.GetHelloString("laurence"))

		fmt.Println(a.ServiceStruct.GetString("laurence"))
	}
}

type Service interface {
	GetHelloString(string) string
}

// +ioc:autowire=true
// +ioc:autowire:type=singleton

type ServiceImpl1 struct {
}

func (s *ServiceImpl1) GetHelloString(name string) string {
	return fmt.Sprintf("This is ServiceImpl1, hello %s", name)
}

// +ioc:autowire=true
// +ioc:autowire:type=singleton

type ServiceImpl2 struct {
}

func (s *ServiceImpl2) GetHelloString(name string) string {
	return fmt.Sprintf("This is ServiceImpl2, hello %s", name)
}

// +ioc:autowire=true
// +ioc:autowire:type=singleton

type ServiceStruct struct {
}

func (s *ServiceStruct) GetString(name string) string {
	return fmt.Sprintf("This is ServiceStruct, hello %s", name)
}

func main() {
	// start
	if err := ioc.Load(); err != nil {
		panic(err)
	}

	// app, err := GetAppIOCInterface 也可以,获取到的是封装了代理层的接口,如下获取到的是未封装的结构体指针。
	app, err := GetApp()
	if err != nil {
		panic(err)
	}
	app.Run()
}
上述所说的“代理层”,是框架为“以接口形式注入/获取”的结构体,默认封装的代理,可以扩展一系列运维操作。我们推荐开发者在编写代码的过程中基于接口编程,则所有对象都可拥有运维能力。
编写完毕后,当前目录执行以下命令,初始化 go mod ,拉取最新代码,生成结构注册代码。(mac 环境可能因权限原因需要sudo):
% go mod init ioc-golang-demo
% export GOPROXY="https://goproxy.cn"
% go mod tidy
% go get github.com/alibaba/ioc-golang@master
% sudo iocli gen
会在当前目录生成:zz_generated.ioc.go,开发者无需关心这一文件,这一文件中就包含了上面使用的 GetApp 方法
//go:build !ignore_autogenerated
// +build !ignore_autogenerated

// Code generated by iocli

package main

import (
        autowire "github.com/alibaba/ioc-golang/autowire"
        normal "github.com/alibaba/ioc-golang/autowire/normal"
        "github.com/alibaba/ioc-golang/autowire/singleton"
        util "github.com/alibaba/ioc-golang/autowire/util"
)

func init() {
        normal.RegisterStructDescriptor(&autowire.StructDescriptor{
                Factory: func() interface{} {
                        return &app_{}
                },
        })
        singleton.RegisterStructDescriptor(&autowire.StructDescriptor{
                Factory: func() interface{} {
                        return &App{}
                },
        })
  ...
func GetServiceStructIOCInterface() (ServiceStructIOCInterface, error) {
        i, err := singleton.GetImplWithProxy(util.GetSDIDByStructPtr(new(ServiceStruct)), nil)
        if err != nil {
                return nil, err
        }
        impl := i.(ServiceStructIOCInterface)
        return impl, nil
}
查看当前目录文件
% tree
.
├── go.mod
├── go.sum
├── main.go
└── zz_generated.ioc.go

0 directories, 4 files
执行程序
go run .
控制台打印输出:
  ___    ___     ____                           _
 |_ _|  / _ \   / ___|           __ _    ___   | |   __ _   _ __     __ _
  | |  | | | | | |      _____   / _` |  / _ \  | |  / _` | | '_ \   / _` |
  | |  | |_| | | |___  |_____| | (_| | | (_) | | | | (_| | | | | | | (_| |
 |___|  \___/   \____|          \__, |  \___/  |_|  \__,_| |_| |_|  \__, |
                                |___/                               |___/
Welcome to use ioc-golang!
[Boot] Start to load ioc-golang config
[Config] Load default config file from ../conf/ioc_golang.yaml
[Config] Load ioc-golang config file failed. open /Users/laurence/Desktop/workplace/alibaba/conf/ioc_golang.yaml: no such file or directory
 The load procedure is continue
[Boot] Start to load debug
[Debug] Debug port is set to default :1999
[Boot] Start to load autowire
[Autowire Type] Found registered autowire type normal
[Autowire Struct Descriptor] Found type normal registered SD main.serviceStruct_
[Autowire Struct Descriptor] Found type normal registered SD main.app_
[Autowire Struct Descriptor] Found type normal registered SD main.serviceImpl1_
[Autowire Struct Descriptor] Found type normal registered SD main.serviceImpl2_
[Autowire Type] Found registered autowire type singleton
[Autowire Struct Descriptor] Found type singleton registered SD main.App
[Autowire Struct Descriptor] Found type singleton registered SD main.ServiceImpl1
[Autowire Struct Descriptor] Found type singleton registered SD main.ServiceImpl2
[Autowire Struct Descriptor] Found type singleton registered SD main.ServiceStruct
[Debug] Debug server listening at :1999
This is ServiceImpl1, hello laurence
This is ServiceImpl2, hello laurence
This is ServiceImpl1, hello laurence
This is ServiceStruct, hello laurence
...
可看到,依赖注入成功,程序正常运行。
调试程序
可看到打印出的日志中包含,说明 Debug 服务已经启动。
[Debug] Debug server listening at :1999
新开一个终端,使用 iocli 的调试功能,查看所有拥有代理层的结构和方法。默认端口为 1999。
% iocli list
main.ServiceImpl1
[GetHelloString]

main.ServiceImpl2
[GetHelloString]
监听方法的参数和返回值。以监听 main.ServiceImpl 结构的 GetHelloString 方法为例,每隔三秒钟,函数被调用两次,打印参数和返回值。
% iocli watch main.ServiceImpl1 GetHelloString
========== On Call ==========
main.ServiceImpl1.GetHelloString()
Param 1: (string) (len=8) "laurence"

========== On Response ==========
main.ServiceImpl1.GetHelloString()
Response 1: (string) (len=36) "This is ServiceImpl1, hello laurence"

========== On Call ==========
main.ServiceImpl1.GetHelloString()
Param 1: (string) (len=8) "laurence"

========== On Response ==========
main.ServiceImpl1.GetHelloString()
Response 1: (string) (len=36) "This is ServiceImpl1, hello laurence"
,,,
注解分析
// +ioc:autowire=true
代码生成工具会识别到标有 +ioc:autowire=true 注解的对象

// +ioc:autowire:type=singleton
标记注入模型为 singleton 单例模型,还有 normal 多例模型等扩展
更多
您可以参阅 示例 查阅更多例子和框架高级用法